Showing posts with label 1. Show all posts
Showing posts with label 1. Show all posts
Thursday, November 20, 2014
How to update Samsung Galaxy S3 to Android 4 1 2 Jelly Bean
Good news to all Samsung galaxy s3 users, the international version of Samsung galaxy s3, which have been the world’s best-selling smartphone, now already received the much anticipated Android 4.1.2 Jelly Bean update over-the-air. Many major national carriers has released Android Jelly for the device, and other Carrier-branded versions like Verizon Wireless should be able to receive the update soon as Samsung is railroading updates for its devices. But some only offer an update that must completed via Samsung Kies software and is not offered over the air.
The new Android 4.12 Jelly Bean Update brings a list of amazing features now only located in Samsung Galaxy Note 2 to Samsung S3, like highly-anticipated Multi View multitasking system, Smart Rotation function , camera filters, low-light photo mode, an easy mode and so on. For some people you may find it is difficult for you to update or wait any longer. So here I will show you How to update Android 4.1 Jelly Bean on Galaxy S3 immediately.Pre-requisites
Heres How to Update Your AT&T Samsung Galaxy S III to Android 4.1 Jelly Bean
Read More..
The new Android 4.12 Jelly Bean Update brings a list of amazing features now only located in Samsung Galaxy Note 2 to Samsung S3, like highly-anticipated Multi View multitasking system, Smart Rotation function , camera filters, low-light photo mode, an easy mode and so on. For some people you may find it is difficult for you to update or wait any longer. So here I will show you How to update Android 4.1 Jelly Bean on Galaxy S3 immediately.Pre-requisites
- Be sure to backup your data before starting the update
- Make sure your battery is at least 50% charged.
- Make sure that you have install Kies software on the computer, and if you dont have Kies, you can download it from Samsung website.
Heres How to Update Your AT&T Samsung Galaxy S III to Android 4.1 Jelly Bean
- Connect your Samsung Galaxy S III to your PC or laptop using the supplied USB cable. Ensure that Kies recognizes your device by looking in the upper section of the left-bar navigation menu. Your device should be listed.
- Kies Device Once Kies recognizes the device you will see a Lcd stating new firmware is available.
- Click Update.
- Read through the Caution pop-up and, if you agree, click to populate the I have read all of the above information checkbox.
- Read the Allow saving of information statement and select Allow saving or Proceed without saving and then click Start upgrade.
- After a few minutes, Kies will then begin transferring the firmware binary to the device.
- Then after a while the upgrade is completed.
- If completed a data backup from your device to Kies prior to performing the update, you can now restore that data back to the device under the new Jelly Bean operating system

Thursday, November 6, 2014
Nokia C2 00 Dual SIM card connection Tracks v 1

Nokia C2 00 Dual SIM card connection Tracks v 1
Wednesday, October 22, 2014
Samsung Galaxy Note 10 1 SHW M480S Running 4 1 2 Jelly Bean Firmware Simple Tutorial How to Root
If you are looking for an easy and working method to root your Samsung Galaxy Note 10.1 SHW-M480S (South Korea) Tablet, then youre on right place. Here youll find a simple step by step guide to root Galaxy Note 10.1 M480S running on Android 4.1.2 Jelly Bean official firmware. The device was released with Android 4..0.4 ICS and last updated to Android 4.1.2 Jelly Bean (Latest Firmware for Galaxy Note 10.1 M480S). If you own the device, then you can now root it using the below tutorial.
After having an Android Tablet or, after updating official firmware, many of us prefer to root our device to enjoy some additional features that unrooted android Tablet doesnt offer. With a rooted android Tablet, you can install apps that ask root permission, flash various custom ROMs, install MODs and tweak various features. Root removes default bloatware apps that free-up lots of memory space and extend the battery life. To know more about benefits of rooting android Tablet, read- Complete Note on What is Rooting and Benefits of Rooting Android Tablet.
 So, want to root your Galaxy Note 10.1 SHW-M480S? Continue reading this page to get all the necessary steps to successfully root your device. The root file (CF-Auto-Root) we used in this tutorial is safe and have nearly 100% success rate. Well use Odin software to flash the root file.
The tutorial is made with simple step by step guide, so that even an android newbie user can follow and successfully root his/her device. However, in this process you may loss your personal data and settings. So, we recommend you to follow all the backup instructions before proceed to rooting guide.
All the above pre-requisites are very important and must be followed before proceed to installation guide. Hope you get all the above points and done as mentioned. Now, you are ready to move to the final step of this tutorial where we have arranged a step by step details guide on how to root Galaxy Note 10.1 SHW-M480S running on official firmware.
After having an Android Tablet or, after updating official firmware, many of us prefer to root our device to enjoy some additional features that unrooted android Tablet doesnt offer. With a rooted android Tablet, you can install apps that ask root permission, flash various custom ROMs, install MODs and tweak various features. Root removes default bloatware apps that free-up lots of memory space and extend the battery life. To know more about benefits of rooting android Tablet, read- Complete Note on What is Rooting and Benefits of Rooting Android Tablet.
The tutorial is made with simple step by step guide, so that even an android newbie user can follow and successfully root his/her device. However, in this process you may loss your personal data and settings. So, we recommend you to follow all the backup instructions before proceed to rooting guide.
All the above pre-requisites are very important and must be followed before proceed to installation guide. Hope you get all the above points and done as mentioned. Now, you are ready to move to the final step of this tutorial where we have arranged a step by step details guide on how to root Galaxy Note 10.1 SHW-M480S running on official firmware.
How to Root Galaxy Note 10.1 SHW-M480S Running Android 4.1.2 Jelly Bean through Odin:

- Download CF-Auto-Root for Galaxy Note 10.1 M480S and extract the Zip file: CF-Auto-Root-p4noterfskt-p4noterfskt-shwm480s.zip
- Download Odin 3.07 and extract the Zip file: Odin 3.07.Zip
- Now, Switch off your Tablet and boot Galaxy Note 10.1 M480S into Download Mode by pressing and holding the Volume Down and Power buttons together (long press until the boot screen appear), now press Volume Up key to proceed to Download Mode.
- Run the Odin3 v3.07.exe file as an administrator (Right click on the .exe file and click on Run as administrator)
- Now connect your Galaxy Note 10.1 M480S to your computer via USB cable
- In Odin3 screen, you should see a COM Port number like “0:[COM7]” at ID:COM section and “Added!” text at the message box. This means your device has been detected by Odin3.
- Make sure that, only the “Auto Reboot” and “F. Reset Time” options are checked.
- Now, click on the PDA button and select the CF-Auto-Root-p4noterfskt-p4noterfskt-shwm480s.tar.md5 file.
- Finally, click on the Start button to begin the rooting process, wait few moments.
- Once completed, you would see “PASS!” message in ID:COM port having green background
- Your Tablet should automatically reboot after completion
- You can now disconnect your Tablet from computer
- Finish
Thursday, September 25, 2014
Easy JTAG Daily Updates v1 0 95 0 v1 0 96 0 box firmware 1 48
Easy-JTAG Daily Updates v1.0.95.0 & v1.0.96.0, box firmware 1.48 
BOX Firmware Update:
The firmware of box updated to 1.48 version.
You can update it via shell or use latest build 1.0.95/96.
Firmware will be updated automaticaly.
In firmware update - improved emmc direct protocol, more stable now.
Emmc Direct changes:
Added:
- access to boot2 , gp1 , gp2 , gp3 and gp4 partitions. You will know soon why need this
- Improved stability of writing some eMMC devices
- NVIDIA Tegra 3 devices are now fully supported ( we working now on sec bypass)
ADDED new devices/phones via JTAG connect:
- Anycall SHW-m200K (Read/Write,OneClickRepair)
- LG D500 (Read/Write,OneClickRepair)
- HTC one XL PJ831000 (Read/Write,OneClickRepair)
Read More..
BOX Firmware Update:
The firmware of box updated to 1.48 version.
You can update it via shell or use latest build 1.0.95/96.
Firmware will be updated automaticaly.
In firmware update - improved emmc direct protocol, more stable now.
Emmc Direct changes:
Added:
- access to boot2 , gp1 , gp2 , gp3 and gp4 partitions. You will know soon why need this
- Improved stability of writing some eMMC devices
- NVIDIA Tegra 3 devices are now fully supported ( we working now on sec bypass)
ADDED new devices/phones via JTAG connect:
- Anycall SHW-m200K (Read/Write,OneClickRepair)
- LG D500 (Read/Write,OneClickRepair)
- HTC one XL PJ831000 (Read/Write,OneClickRepair)
Friday, September 19, 2014
Tuesday, September 2, 2014
VRoot 1 7 0 1 Click Root Method mostly All android phone not metter which brand Free Download This Software
VRoot 1.7.0 - 1-Click Root technique principally All robot phone not matter that complete and that modal
Supported devices:lot of devices up to robot four.x (4.0~4.3)
download this software system
Download
after this software system are motorcar update to one.6.-
producer for install as a result of chines language thus i post all step
Next.

Dont create start menu. (as you wish)

Create desktop icon.

Finish. Uncheck if you dont want to start the rooting app now.

after this open software and connect phone(must enable usb debugging)

then click on Root during root phone will be restart
note:after root superuser will be display in English language not in chines
more shocking news on the way
Supported devices:lot of devices up to robot four.x (4.0~4.3)
download this software system
Download
after this software system are motorcar update to one.6.-
producer for install as a result of chines language thus i post all step
Next.
Dont create start menu. (as you wish)
Create desktop icon.
Finish. Uncheck if you dont want to start the rooting app now.
after this open software and connect phone(must enable usb debugging)
then click on Root during root phone will be restart
note:after root superuser will be display in English language not in chines
more shocking news on the way
Monday, September 1, 2014
Tablet T733 MAINBORD v2 0 Update Done To 4 2 1 With Orginal Rom
Tablet -T733 MAINBORD-v2.0 Update Done To 4.2.1 With Orginal Rom
PCB ID -T733 Mainboard v2.0 , 2013/07/01
T733 MAINBORD-v2.0 : Rom Link1
Flashing Done

PCB IMAGE

Read More..
PCB ID -T733 Mainboard v2.0 , 2013/07/01
T733 MAINBORD-v2.0 : Rom Link1
Flashing Done
PCB IMAGE

Tuesday, August 19, 2014
How to Root Samsung Galaxy S3 I9300 Android 4 1 2 With Guide
Just a month back Samsung released a minor 40 MB update for Samsung Galaxy S3 I9300 running Android 4.1.2 ( Feels bad stuck on Android 4.1.2 for ages ) , Officially there were no change logs provided for the update but we can assume that it was probably an minor performance upgrade . As it is with installing an Official software update , My Samsung galaxy S3 was unrooted in this process .
Once again i had to source for the latest CF auto root and Odin to root my Samsung galaxy S3 . In fact i even tried Framaroot which had previously worked on my Samsung galaxy S3 , but after the update Framaroot was unable to root my Galaxy S3 . So the only option i had left was to root my Samsung Galaxy S3 through Odin .
If you had installed the same update , then follow the instructions below to manually root your Samsung Galaxy S3 I9300 using Odin and CF-Auto-Root by Chainfire .
NOTE: This guide is only for users having the international version of the Samsung Galaxy S3 I9300 .
Instructions to Root Samsung Galaxy S3 using Odin
- Step 1: Download CF-Auto-Root and Odin from the links below :
Download Odin ( Use Odin 3.07 from this package )
- Step 2: Install Odin on your PC and run it as Administrator . Now lets prepare your phone for rooting .
- Step 3: Enable USB debugging in your phone . To enable USB debugging navigate to Settings > System > Developer options > Debugging > USB debugging .
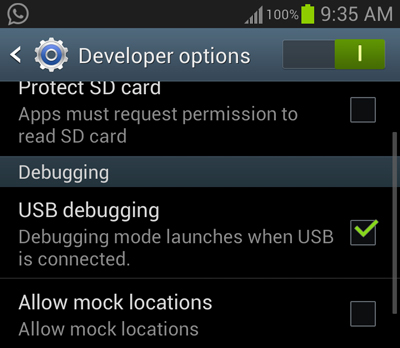
- Step 4: Turn off your phone and turn on your phone into download mode by pressing the Volume down + Home + Power keys together . When your phone displays a warning , press the Volume up button to continue into Download mode .
- Step 5: Connect your Samsung galaxy S3 to your PC using a Data cable .
- Step 6: You should now see the Odin’s ID:COM status change into blue and an Added message will be displayed .
- Step 7: Check Auto reboot and F.Reset options in Odin .
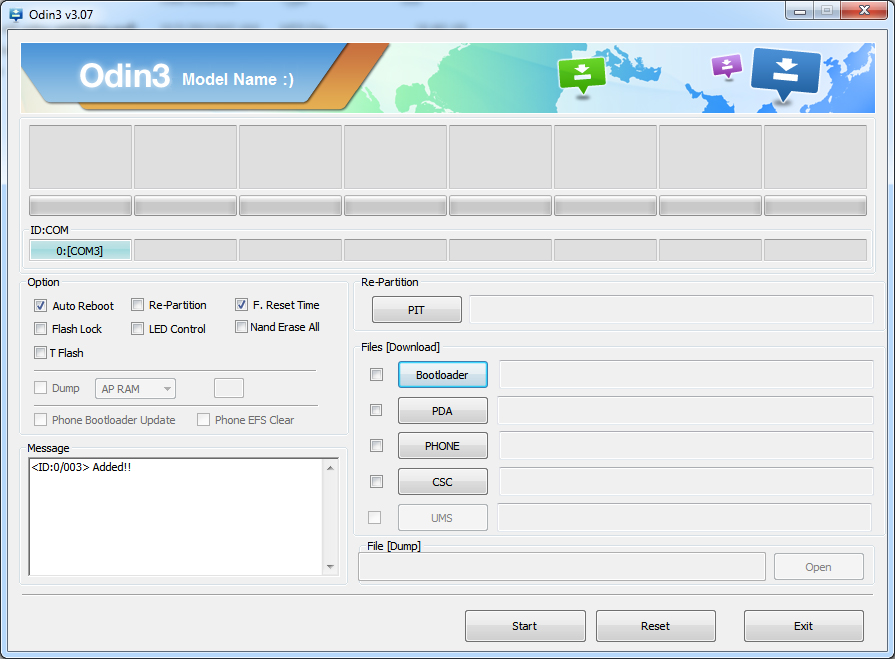
- Step 8: Click on the PDA button and select the CF-Autoroot file .
- Step 9: Double check all the instructions above and Click Start to Root your Samsung Galaxy S3 . Wait for a few minutes and you will see a Success message as below :
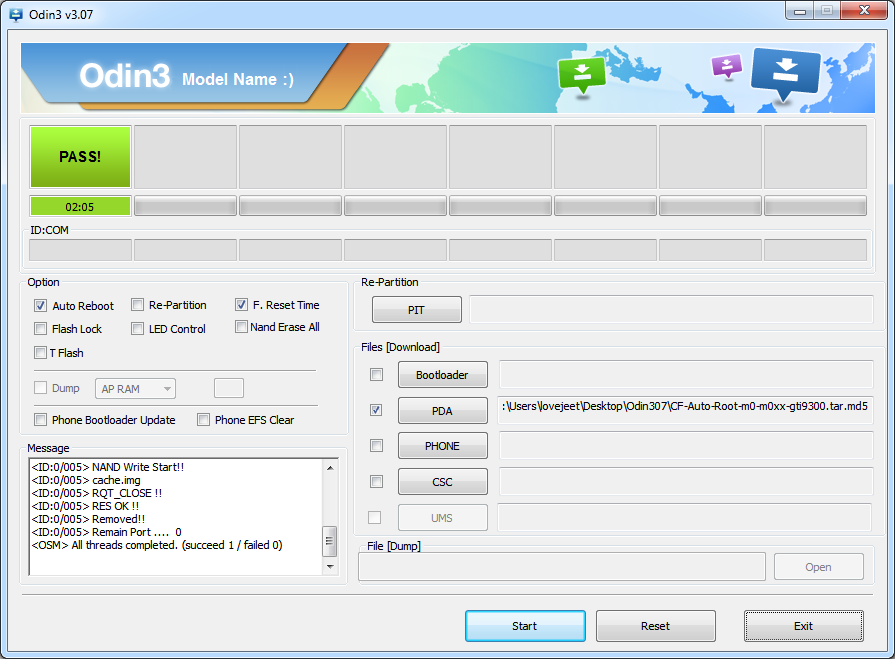
If you want to confirm whether your Samsung Galaxy S3 is rooted not then Install the Root checker app from the Google play store .Here is a screenshot of root checker app on my Samsung Galaxy S3 .
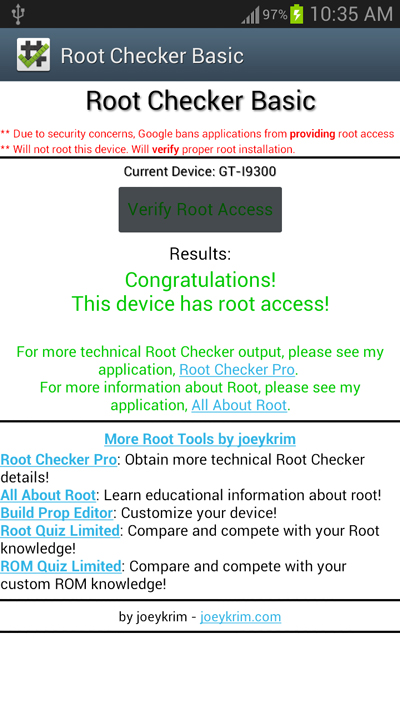
Incoming search terms:
- how to root samsung galaxy s3
- how to root galaxy s3
- root galaxy s3
- how to root s3
- root samsung galaxy s3
Tuesday, August 12, 2014
How to Easily Root Nexus 7 2013 Wi Fi on Android 4 4 1 and Install CWM KOT49E KitKat TWRP Recovery
Hi friends today I will try to give an Root of how the nexus 7, either the one we started from the introduction of Google has just released Android 4.4.1 OTA update with version Kitkat build KOT49E you to get the Wi-Fi version of the Nexus 7 (2013).
Note: You can manually download the OTA for Nexus 7 (2013) Wi-Fi directly from Google Server Update and follow the step-by-step guide to install the update manually.
Nexus 7 (2013) Wi-Fi users who have updated their devices with Android 4.4.1 KOT49E KitKat, can root their devices by using the tutorial below.

Disclaimer: Rooting voids the warranty of your device. We and the developer of this rooting procedures shall not be held responsible if any undesirable outcomes may happen to your device. use of this root guide is solely at your own risk!
Pre-requisites
1. Make a backup of all your important data before following the guide.
2. Enable USB Debugging Mode on the tablet. Go to Settings >> About Phone. Tap on Build Number several times till the message shows "You are now a Developer". Exit from "About Phone" and find the "Developer Options" settings. Enable USB debugging.
3. The Nexus 7 bootloader should be unlocked.
4. Ensure the battery of the tablet is charged more than 80 percent.
5. The CWM/TWRP Recovery and SuperSU files compatible only with the Wi-Fi version of Nexus 7 (2013). Applying these on any incorrect variant will brick the device. Verify the model number of the Nexus 7 by navigating to Settings >> About Phone.
File Required
1. Android SDK
2. Fastboot
4. SuperSU (UPDATE-SuperSU-v1.75.zip) or the latest version
Steps to Root Nexus 7 (2013) Wi-Fi Running on Android 4.4.1 KOT49E KitKat and Install CWM/TWRP Recovery
- Install the Android SDK. The package includes the necessary drivers for connecting your tablet to the computer, which is mandatory for the rooting process.
- Extract the Fastboot .zip file using winrar/7zip/winzip or any other extracting tool and copy it to the android-sdk-windowsplatform-tools directory on the computer.
- Copy the CWM or TWRP .img file to the android-sdk-windowsplatform-tools directory on the computer.
- Connect the Nexus 7 to the computer using USB cable. Then copy the SuperSU .zip file to the SD card of your tablet.
- Switch off the Nexus 7. Then boot the device into fastboot mode by pressing and holding Volume Up, Volume Down, and Power buttons together.
- Navigate to android-sdk-windowsplatform-tools directory and open Command Prompt (Shift + Right-click >> Open Command Prompt). Then run the following command:
fastboot flash recovery recovery-clockwork-touch-6.0.4.3-grouper.img
- Once completed, choose RECOVERY from the Fastboot menu and enter Recovery Mode.
- In CWM Recovery, select "install zip from sdcard" and then select "choose zip from sdcard". Now, navigate to the SuperSU .zip file that you copied earlier and confirm the installation by selecting Yes.
- Once the installation process completes, return to main recovery menu and select "reboot system now".
Nexus 7 (2013) Wi-Fi running on Android 4.4.1 KOT49E KitKat is now rooted successfully. Open the app drawer of the Nexus 7 and look for an app called SuperSU. Verify the root status of the device by downloading Root Checker app from Google Play Store.
Subscribe to:
Posts (Atom)
