Showing posts with label update. Show all posts

Thursday, November 20, 2014

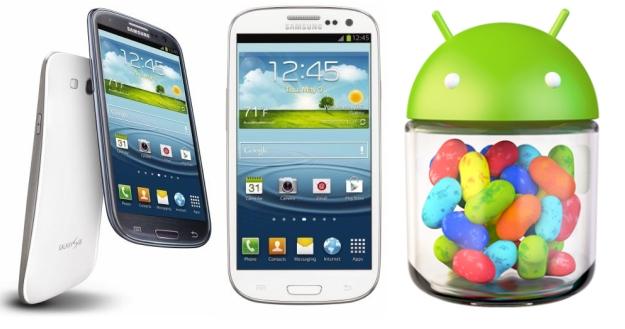
How to update Samsung Galaxy S3 to Android 4 1 2 Jelly Bean

Good news to all Samsung galaxy s3 users, the international version of Samsung galaxy s3, which have been the world’s best-selling smartphone, now already received the much anticipated Android 4.1.2 Jelly Bean update over-the-air. Many major national carriers has released Android Jelly for the device, and other Carrier-branded versions like Verizon Wireless should be able to receive the update soon as Samsung is railroading updates for its devices. But some only offer an update that must completed via Samsung Kies software and is not offered over the air.

The new Android 4.12 Jelly Bean Update brings a list of amazing features now only located in Samsung Galaxy Note 2 to Samsung S3, like highly-anticipated Multi View multitasking system, Smart Rotation function , camera filters, low-light photo mode, an easy mode and so on. For some people you may find it is difficult for you to update or wait any longer. So here I will show you How to update Android 4.1 Jelly Bean on Galaxy S3 immediately.Pre-requisites 
  1. Be sure to backup your data before starting the update
  2. Make sure your battery is at least 50% charged.
  3. Make sure that you have install Kies software on the computer, and if you dont have Kies, you can download it from Samsung website.
For international version: If the software update didn’t popped up in the notifications area, you can update your Samsung Galaxy S3 to Android 4.1.2 Jelly Bean by connecting the terminal to Kies or OTA, by manually checking for the update for the latter method. Just go to Settings > About Device > Software Update > Check for Updates and see whether the new firmware has rolled out for your device.

Heres How to Update Your AT&T Samsung Galaxy S III to Android 4.1 Jelly Bean
  • Connect your Samsung Galaxy S III to your PC or laptop using the supplied USB cable. Ensure that Kies recognizes your device by looking in the upper section of the left-bar navigation menu. Your device should be listed.
  • Kies Device Once Kies recognizes the device you will see a Lcd stating new firmware is available.
  • Click Update.
  • Read through the Caution pop-up and, if you agree, click to populate the I have read all of the above information checkbox.
  • Read the Allow saving of information statement and select Allow saving or Proceed without saving and then click Start upgrade.
  • After a few minutes, Kies will then begin transferring the firmware binary to the device.
  • Then after a while the upgrade is completed.
  • If completed a data backup from your device to Kies prior to performing the update, you can now restore that data back to the device under the new Jelly Bean operating system 
Read More..

Monday, September 15, 2014

How To Update Galaxy Note 3 SM N900 via Kies

  1. Make sure you have stable internet connection on your computer.
  2. Now download and install Samsung Kies on your computer.
  3. Turn on your device (if it off) and then connect it to computer with USB cable.
  4. Run Samsung Kies and wait for it to detect your device.
  5. You should see a New Firmware Upgrade is available at Samsung Kies home Lcd.
  6. Press the Firmware Upgrade button to proceed.
  7. Follow on Lcd instruction and soon you will see your device running upgrade and reboot automatically. Once done, you can disconnect your device from computer.
Again! If you see “This is the latest firmware” in Samsung Kies, then your device yet to receive the latest update on Kies. Its good time to go for manual update instruction that located below.
N900XXUDNA6 Android 4.3 Jelly Bean Firmware Details:
PDA: N900XXUDNA6
CSC: N900SERDNA6
Download: N900XXUDNA6_N900SERDNA6_SER.zip

[Please Note: After flashing this firmware you will lost any installed custom ROM including CM10.2, AOKP, Avatar, Beanstalk, Omni ROM, Slim ROM, Pac-Man, Paranoid Android, LiquidSmooth or Carbon.
Read More..

Friday, September 12, 2014

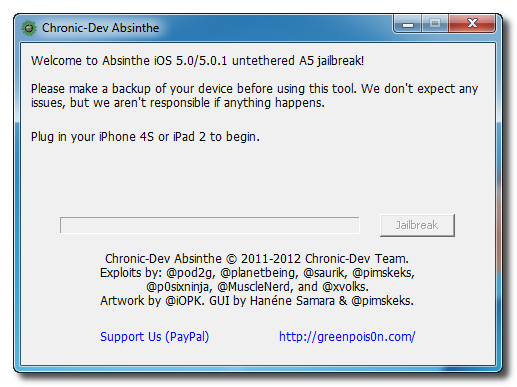
update 2 Chronic Dev Team Releases Update to Absinthe Jailbreak Utility

Chronic Dev-Team Releases Update to Absinthe Jailbreak Utility.

The Chronic Dev-Team has released an update to its Absinthe jailbreak utility that brings support for Mac OS X 10.5 (Intel + PPC).


Whats New in Version 0.4
● Mac: added support for OSX 10.5, PPC and Intel CPU
● added consistency check on startup to make sure required files are in place
● Windows: fixed bug in payload generator that might cause a crash

You can download the latest version of Absinthe from here.
Whats New in Version 0.4
● Mac: added support for OSX 10.5, PPC and Intel CPU
● added consistency check on startup to make sure required files are in place
● Windows: fixed bug in payload generator that might cause a crash

You can download the latest version of Absinthe from here.


Absinthe Jailbreak Gide
************************************************** ************************
Step One
Download the latest version of Absinthe from here.

Step Two
Double click to extract the downloaded archive and launch the Absinthe application.


Step Three
As prompted, connect your iPhone 4S to the computer via USB. Make sure to remove any passcodes or VPN settings youve previously set.


Step Four
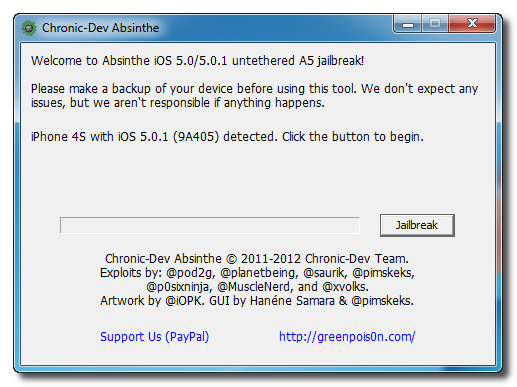
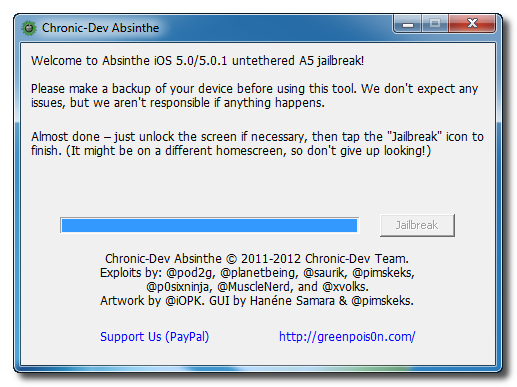
Click the Jailbreak button to begin


Step Five
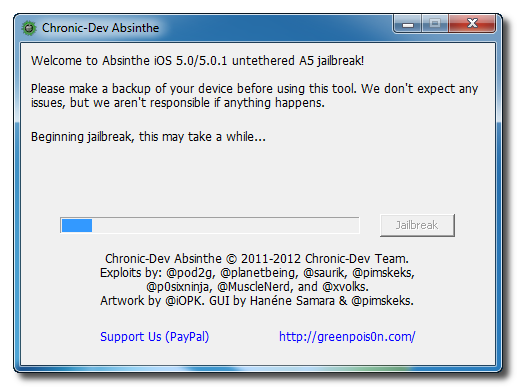
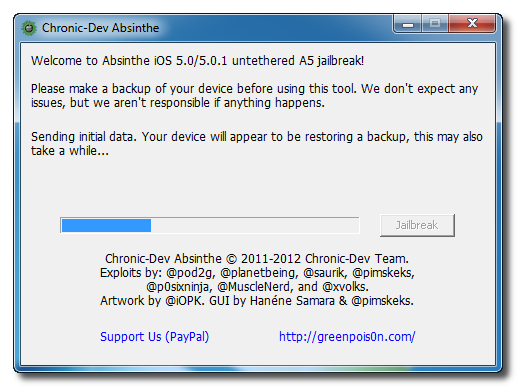
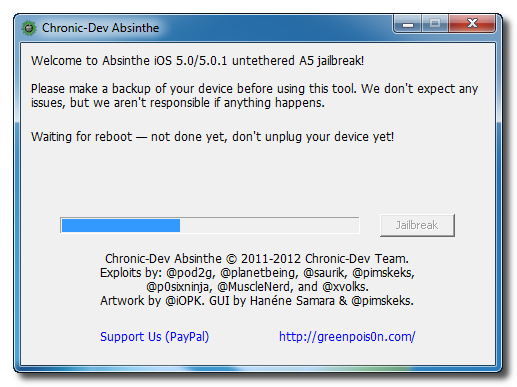
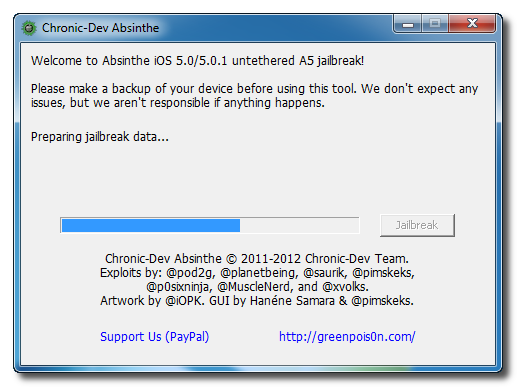
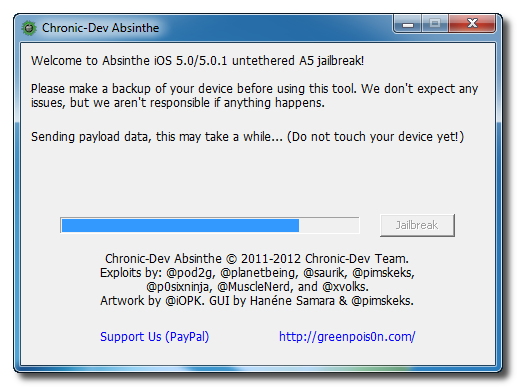
The application will take you through several steps of the jailbreak: Sending initial data, waiting for reboot, waiting for device to finish booting, Preparing jailbreak data, and Sending payload data.


tep Six
You will be informed that the jailbreak is Almost done.


Step Seven
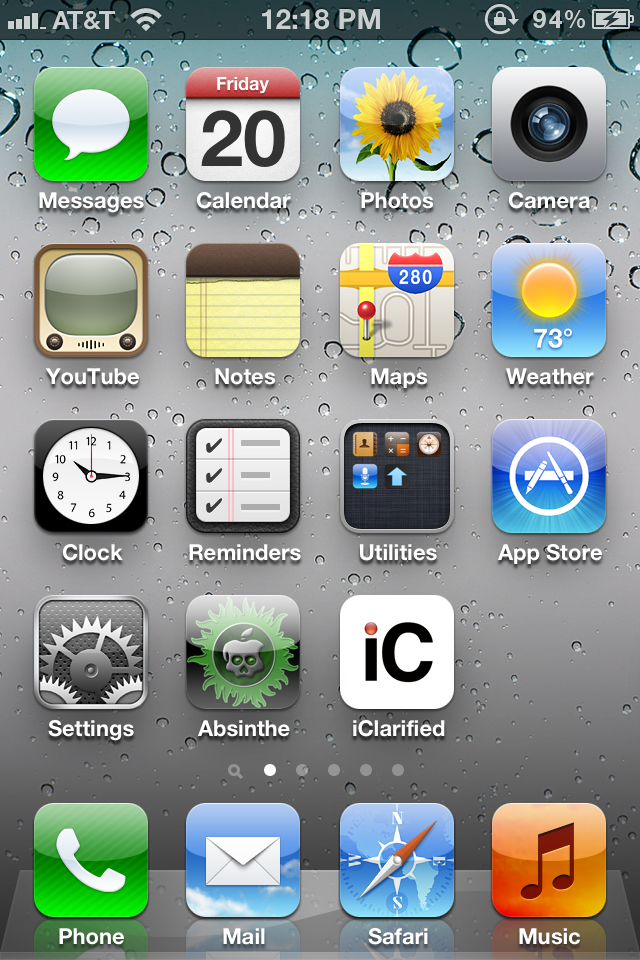
On your device, locate the Absinthe icon and press it to complete your jailbreak. It could be on any homeLcd.


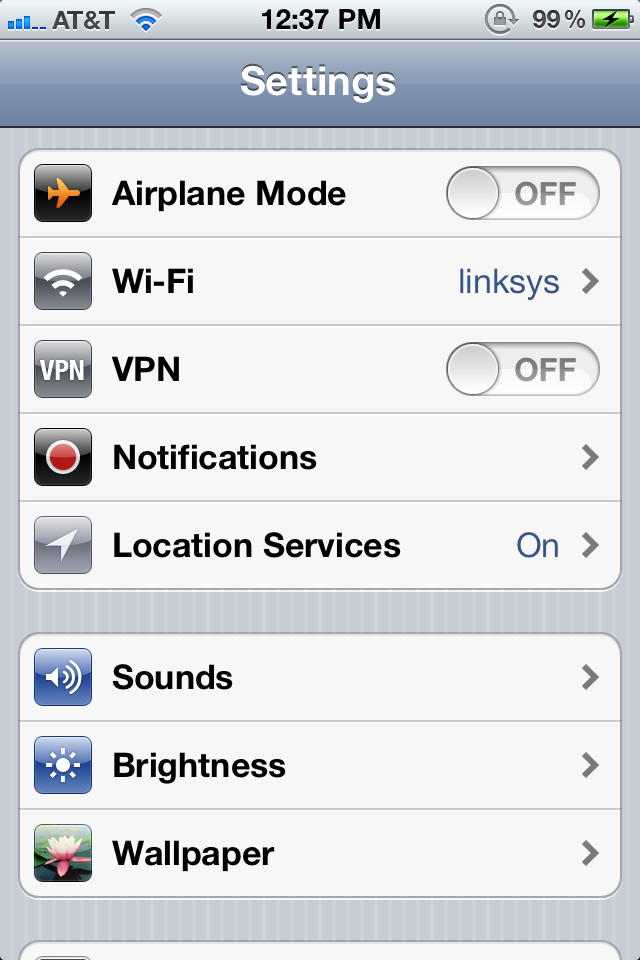
If the server is down and you get an Error establishing a database connection message then tap the Settings icon on your springboard and turn on VPN.


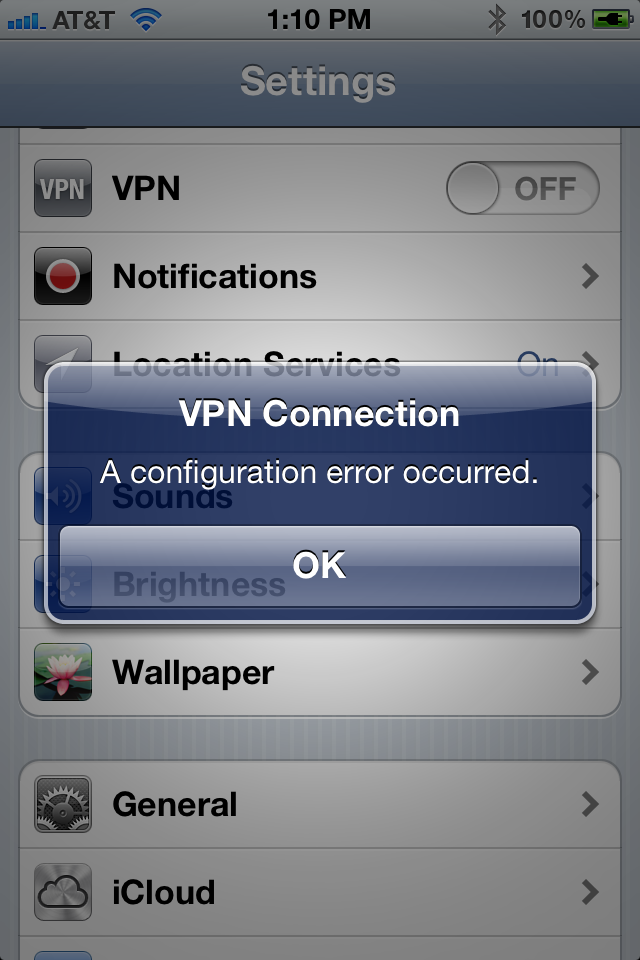
You will get a configuration error; however, after about a minute your device will reboot with Cydia on the Springboard!
Read More..

Wednesday, September 10, 2014

Easy Ways to Update Galaxy S4 Mini I9190 with Android 4 2 2 DXUAMK 2 Jelly Bean Official Firmware

For Samsung Galaxy S4 Mini with Model Number GT-I9190 has been getting updates Jelly Bean Android 4.2.2 with the latest firmware base I9195XXUBML1. The new firmware is now officially available as an Over-The-Air (OTA) and via the Samsung Kies update.


Firmware details
PDA: I9190DXUAMK2
CSC: I9190OLBAMK3
MODEM: I9190DXUAMK2
Version: Android 4.2.2
Build date: Nov 11, 2013
Regions: Indonesia, Malaysia, Singapore, Vietnam, Thailand

Samsung Galaxy S4 Mini I9190 users who missed the OTA update notification or unable to access the update over Samsung KIES, may follow our step-by-step guide to install the update manually.

Pre-requisites
1. Install USB Drivers for Samsung Galaxy S4 Mini on the computer.
2. Enable USB Debugging Mode on the phone by navigating to Settings >> Developer Options.
3. Make a backup of all your important data before following the guide.
4. The Galaxy S4 Mini should be factory unlocked and not locked to any particular carrier.
5. Ensure the battery of the phone is charged more than 80 percent.
6. The Android 4.2.2 DXUAMK2 Jelly Bean firmware is compatible only with the 3G version of the Samsung Galaxy S4 Mini (GT-I9190). Applying this to any incorrect variant might brick the device. Verify the model number of the Galaxy S4 Mini by navigating to Settings >> About Phone.

Files Required

1. Android 4.2.2 DXUAMK2 Jelly Bean Firmware for Galaxy S4 Mini I9190
2. Odin 3.07

Steps to Update Galaxy S4 Mini I9190 with Android 4.2.2 DXUAMK2 Jelly Bean Firmware
Step 1: Extract Firmware zip file using winrar/7zip/winzip or any other extracting tool, you will get a .tar.md5 file and some other files.
Step 2: Extract Odin zip file and you will get Odin3 v3.07.exe along with few other files.
Step 3: Switch off the Galaxy S4 Mini.
Step 4: Boot the device into Download Mode by pressing and holding Volume Down, Homeand Power buttons together until a construction Android robot icon with a warning triangle appears on Lcd. Now press the Volume Up button to enter Download Mode.
Step 5: Run Odin on the computer as an Administrator.
Step 6: Connect the Galaxy S4 Mini to the computer using USB cable while it is in the Download Mode. Wait until Odin detects the device. When the device is connected successfully, the ID: COM box will turn to light blue with the COM port number. Additionally, the successful connected will be indicated by a message saying Added.

Note: If the Added message does not appear, then try re-install USB drivers or changing the port on the computer.
Step 7: Select the following files in Odin from extracted I9190DXUAMK2 firmware folder:
  • Click the PDA button and select the .tar.md5 file.
  • Click the Phone button and select file with MODEM in its name. Ignore if there is no such file.
  • Click the CSC button and select file with CSC in its name. Ignore if there is no such file.
  • Click the PIT button and select the .pit file. Ignore if there is no such file.

Step 8: In Odin, enable Auto Reboot and F. Reset Time checkboxes. Also, ensure the Re-Partition checkbox is chosen only if a .pit file was chosen in the previous step.
Step 9: Verify everything suggested in Step 7 and Step 8 is done correctly. Then hit the Startbutton to begin the installation process.
Step 10: Once the installation process is completed, your phone will restart and soon you will see a PASS message with green background in the left-most box at the very top of the Odin. You can now unplug the USB cable to disconnect it from the computer.

Samsung Galaxy S4 Mini I9190 should be now updated with official Android 4.2.2 DXUAMK2 Jelly Bean. Head over to Settings >> About Phone to verify the software version running on the device.

Note: If Galaxy S4 Mini I9190 stuck at booting animation after Step 10 then go to recovery mode (press and hold the Volume Up, Home and Power buttons together) and perform Wipe data/Factory Reset and Wipe Cache Partition task before selecting reboot system now function. In recovery mode use Volume keys to navigate between options and Power key to select the option. Please note, performing wiping task will erase your device internal memory data and not external SD card data.
Read More..

Monday, September 8, 2014

Latest Firmware T730 MAINBOARD V6 3 Update Rom

In this post i will show you the source where you can download Latest Firmware T730 MAINBOARD V6 3 Update Rom. but please understand we can't waranty this is will work for you. but there no problem to try. you can download  here Use the pass tmobile2013 is ask for password.

Read More..

Thursday, September 4, 2014

How To Update Samsung Galaxy S3 LTE GT I9305 Firmware Version Using Odin Flasher

What is Firmware Update Process and Why We Need it:
The Firmware Update process means that your device will get a newer software version or we can say it will run with a newer version of its Operating System, For example if your Samsung Android device is running Android version 4.0.4 and Samsung release Android 4.1.2 version, Then you need to perform a Firmware Update process to install the new version into your device.

Mostly the new Firmware version is released to fix some bugs or to add some new functions, And sometimes it is released to fix some security threats.

What we should do before performing the update:
- First of all you should know your current device firmware version, Write it down so in case something goes wrong it will help you to fix your device.
- Check that you got the suitable firmware package for your device, And make sure to get it from trusted sources only.
- Check your devices battery level to be at least at 90%, Otherwise charge it before starting the update process.
- Make sure to backup any saved data into your device, Like contacts, messages...etc.

Needed Downloads For Updating Samsung I9305 GS3 LTE Firmware:
- Samsung I9305 GS3 LTE Stock Firmware Package.
- Odin Flasher.
- Samsung I9305 GS3 LTE USB Drivers.

Needed Tools For Updating Samsung I9305 GS3 LTE Firmware:
- Suitable USB cable.
- A stable computer running Windows OS.

Important Notice: We provide this guide for help purpose only, And we hold no responsibility at all, So keep in mind that your are doing this at your own RISK.

Preparation:
After downloading the needed files you should extract the zipped ones, And install the USB drivers (Restart your PC after installing).


Samsung GT-I9305 GS3 LTE Firmware Update Steps:

- Turn off the device, And take out its battery, SIM and memory cards.
- Run Odin.exe program.
- Check these options: Re-Partition (If you have PIT file only), Auto Reboot, F.Reset Time.
- Click PIT button to select: m3.pit
- Firmware files selection:


Click PDA button to select: CODE_I9305xxxxxx_746327_REV00_user_low_ship.tar.md5
Click Phone button to select: MODEM_I9305xxxxxx_REV05_CL1213990.tar.md5
Click CSC button to select: CSC_xx_I9305Oxxxxxx_1065030_REV00_user_low_ship.tar.md5

- Entering the Download Mode:
Put the battery back into your device, Press and Hold Volume Down key + Power, After you get the warning message release all keys and press Volume Up key.

- Use the USB cable to connect your device to the computer, Dont use any USB-HUB for connecting, And use only main USB slots.
- Wait until Windows detects the connected device and installs its suitable USB drivers.
- In case everything is OK, Then Odin program will detect your connected device (0:[COMxx]).
- Click on Start button.
- Odin program will start installing the new firmware files into your device, So wait until the device reboots.
- If the update was successfully done, Then you will notice PASS! Word at Odin program.
- Disconnect the USB cable.
- Check your device firmware version *#1234# (You should see the new installed one).
- Turn off the device again, Reinsert the SIM and memory cards and turn it on.
- Now you can customize your device after installing the new firmware version.
- If you made any backup of your device data before the update then you can restore it again.
- Done.

Notice: When you get one big file inside the firmware package, Then it should be selected as a PDA file only, And do not check Re-Partition option or use PIT file at all.
Read More..

Monday, September 1, 2014

Tablet T733 MAINBORD v2 0 Update Done To 4 2 1 With Orginal Rom

Tablet -T733 MAINBORD-v2.0 Update Done To 4.2.1 With Orginal Rom
PCB ID -T733 Mainboard v2.0 , 2013/07/01

T733 MAINBORD-v2.0 : Rom Link1

Flashing Done


PCB IMAGE
Read More..

Monday, August 25, 2014

Samsung Galaxy Ace 3 Latin S7270L Android 4 2 2 UBUANB1 Jelly Bean Official Firmware How to Update Guide


Samsung has recently released a new Android 4.2.2 Jelly Bean update for the Latin version of Galaxy Ace 3 with model number GT-S7270L. The new official firmware is currently available as an Over-The-Air (OTA) update as well as through Samsung KIES.
Firmware details
PDA: S7270LUBUANB1
CSC: S7270OXEANA3
MODEM: S7270XXUANA2
Version: Android 4.2.2
Build date: Feb 26, 2014
Regions: Panama
Samsung Galaxy Ace 3 (Latin) S7270L users who missed the OTA update notification or unable to access the update over Samsung KIES, may follow our step-by-step guide to install the update manually.
Pre-requisites
1. Install USB Drivers for Samsung Galaxy Ace 3 on the computer.
2. Enable USB Debugging Mode on the phone by navigating to Settings >> Developer Options.
3. Make a backup of all your important data before following the guide.
4. Ensure the battery of the phone is charged more than 80 percent.
5. The Android 4.2.2 UBUANB1 Jelly Bean firmware is compatible only with the Latin version of Galaxy Ace 3 (GT-S7270L). Applying this to any incorrect variant might brick the device. Verify the model number of the Galaxy Ace 3 by navigating to Settings >> About Phone.

Files Required
1. Android 4.2.2 UBUANB1 Jelly Bean Firmware (Mirror Link) for Galaxy Ace 3 (Latin) S7270L
2. Odin 3.07
Steps to Update Galaxy Ace 3 (Latin) S7270L with Android 4.2.2 UBUANB1 Jelly Bean Firmware
Step 1: Extract Firmware zip file using WinRAR/7-Zip/WinZip or any other extracting tool, you will get a .tar.md5 file and some other files (optional).
Step 2: Extract Odin zip file and you will get Odin3 v3.07.exe along with few other files.
Step 3: Switch off the Galaxy Ace 3.
Step 4: Boot the device into Download Mode by pressing and holding Volume Down, Home and Power buttons together until a construction Android robot icon with a warning triangle appears on screen. Now press the Volume Up button to enter Download Mode.
Step 5: Run Odin on the computer as an Administrator.
Step 6: Connect the Galaxy Ace 3 to the computer using USB cable while it is in the Download Mode. Wait until Odin detects the device. When the device is connected successfully, the ID: COM box will turn to light blue with the COM port number. Additionally, the successful connected will be indicated by a message saying Added.

Step 7: Select the following files in Odin from extracted S7270LUBUANB1 firmware folder:
  • Click the PDA button and select the .tar.md5 file.
  • Click the Phone button and select file with MODEM in its name. Ignore if there is no such file.
  • Click the CSC button and select file with CSC in its name. Ignore if there is no such file.
  • Click the PIT button and select the .pit file. Ignore if there is no such file.
Step 8: In Odin, enable Auto Reboot and F. Reset Time checkboxes. Also, ensure the Re-Partition checkbox is chosen only if a .pit file was chosen in the previous step.
Step 9: Verify everything suggested in Step 7 and Step 8 is done correctly. Then hit the Start button to begin the installation process.
Step 10: Once the installation process is completed, your phone will restart and soon you will see a PASS message with green background in the left-most box at the very top of the Odin. You can now unplug the USB cable to disconnect it from the computer.

Samsung Galaxy Ace 3 (Latin) S7270L should be now updated with Android 4.2.2 UBUANB1 Jelly Bean official firmware. Head over to Settings >> About Phone to verify the software version running on the device.

Note: If Galaxy Ace 3 (Latin) S7270L stuck at booting animation after Step 10 then go to recovery mode (press and hold the Volume Up, Home and Power buttons together) and perform Wipe data/Factory Reset and Wipe Cache Partition task before selecting reboot system now function. In recovery mode use Volume keys to navigate between options and Power key to select the option. Please note, performing wiping task will erase your device internal memory data and not external SD card data.
Read More..

Sunday, August 24, 2014

How to Update Samsung Galaxy Mega 6 3 I9200 with Android 4 4 2 XXUDNE4 KitKat Official Firmware Using Odin Guide


Samsung Galaxy Mega 6.3 with model number GT-I9200 has started receiving Android 4.4.2 KitKat update with firmware build number I9200XXUDNE4. The new official firmware is currently available as an Over-The-Air (OTA) update as well as through Samsung KIES.
Firmware details
PDA: I9200XXUDNE4
CSC: I9200SERDNE4
MODEM: I9200XXUDNE4
Version: Android 4.4.2
Build date: May 21, 2014
Regions: Russia
Samsung Galaxy Mega 6.3 I9200 users who missed the OTA update notification or unable to access the update over Samsung KIES, can now download and install the same manually using our step-by-step guide.
Pre-requisites
1. Install USB Drivers for Samsung Galaxy Mega 6.3 on the computer.
2. Enable USB Debugging Mode on the phone by navigating to Settings >> Developer Options.
3. Make a backup of all your important data before following the guide.
4. Ensure the battery of the phone is charged more than 80 percent.
5. The Android 4.4.2 XXUDNE4 KitKat firmware is compatible only with the 3G version of Samsung Galaxy Mega 6.3 (GT-I9200). Applying this to any incorrect variant might brick the device. Verify the model number of the Galaxy Mega 6.3 by navigating to Settings >> About Phone.
Files Required
1. Android 4.4.2 XXUDNE4 KitKat Firmware (Mirror Link) for Galaxy Mega 6.3 I9200
2. Odin 3.07
Steps to Update Galaxy Mega 6.3 I9200 with Android 4.4.2 XXUDNE4 KitKat Firmware
Step 1: Extract Firmware zip file using WinRAR/7-Zip/WinZip or any other extracting tool, you will get a .tar.md5 file and some other files (optional).
Step 2: Extract Odin zip file and you will get Odin3 v3.07.exe along with few other files.
Step 3: Switch off the Galaxy Mega 6.3.
Step 4: Boot the device into Download Mode by pressing and holding Volume Down, Home and Power buttons together until a construction Android robot icon with a warning triangle appears on screen. Now press the Volume Up button to enter Download Mode.
Step 5: Run Odin on the computer as an Administrator.
Step 6: Connect the Galaxy Mega 6.3 to the computer using USB cable while it is in the Download Mode. Wait until Odin detects the device. When the device is connected successfully, the ID: COM box will turn to light blue with the COM port number. Additionally, the successful connected will be indicated by a message saying Added.
Step 7: Select the following files in Odin from extracted I9200XXUDNE4 firmware folder:
  • Click the PDA button and select the .tar.md5 file.
  • Click the Phone button and select file with MODEM in its name. Ignore if there is no such file.
  • Click the CSC button and select file with CSC in its name. Ignore if there is no such file.
  • Click the PIT button and select the .pit file. Ignore if there is no such file.
Step 8: In Odin, enable Auto Reboot and F. Reset Time checkboxes. Also, ensure the Re-Partition checkbox is chosen only if a .pit file was chosen in the previous step.
Step 9: Verify everything suggested in Step 7 and Step 8 is done correctly. Then hit the Start button to begin the installation process.
Step 10: Once the installation process completes, your phone will restart and soon you will see a PASS message with green background in the left-most box at the very top of the Odin. You can now unplug the USB cable to disconnect your device from the computer.
Samsung Galaxy Mega 6.3 I9200 should be now updated with Android 4.4.2 XXUDNE4 KitKat official firmware. Head over to Settings >> About Phone to verify the software version running on the device.
Note: If Galaxy Mega 6.3 I9200 stuck at booting animation after Step 10 then go to recovery mode (press and hold the Volume Up, Home and Power buttons together) and perform Wipe data/Factory Reset and Wipe Cache Partition task before selecting reboot system now function. In recovery mode use Volume keys to navigate between options and Power key to select the option. Please note, performing wiping task will erase your device internal memory data and not external SD card data.

Read also: How to Root Galaxy Mega 6.3 I9200/I9205 on Android 4.2.2 Jelly Bean Firmware
Read More..

Monday, August 18, 2014

II Tutorial II Create PhoenixCard Allwinner Chip Script Update With SD Card By Azim

II-Tutorial-II-Create PhoenixCard-Allwinner Chip Script Update With SD Card
III-Tutorial-III
How To Create PhoenixCard
How Allwinner Chip Script Update Using SD Card

Friends,
Please Post About Thread Title
If Any One Feel Problem Post Here I Will Reply You
Only Post About This Thread Title


Use Thanks Button If You Like To Use & Care Forum Rules

Ha Ha Ha
No Need Bootkey , Usb , PhoenixSuit & LiveSuit.exe
Update Your Allwinner Chip Using SD Card
Also
For This Not Require Any Mode
Just On Your Tab & Start Update (Auto)
Lest See Tutorial
With Tested Report

How To Create PhoenixCard Using PhoenixCard.exe

Open Your PhoenixCard.exe
Click To DiskCheck Then Select Your Disk (Memory Drive)

PhoenixCard-Allwinner

Click To IMG File & Select Your .IMG (Image) File
PhoenixCard-Allwinner

Screenshots Number 3 Gide By AzimBahar ..::One-Man::..

PhoenixCard-Allwinner

Click To Normal Format & Wait ...After Format Success Click To Ok

PhoenixCard-Allwinner

Click To Brun & Wait For Brun Done
PhoenixCard-Allwinner

Brun Done , Now Your PhoenixCard Is Ready Card Create Done For Update
PhoenixCard-Allwinner
Read More..