Friday, October 31, 2014
Hard Reset a Sony Ericsson X1 or X1a
To perform a master/hard reset on your Sony Ericsson X1 or X1a you will need to:
1. Turn off the phone
2. Hold both right and left buttons(soft keys)
3. press power button, while still holding the other two
The other way to do this is by holding the two soft keys and hit reset button, then on your keyborad press "R"
Read More..
1. Turn off the phone
2. Hold both right and left buttons(soft keys)
3. press power button, while still holding the other two
The other way to do this is by holding the two soft keys and hit reset button, then on your keyborad press "R"
Thursday, October 30, 2014
How to Nokia Master reset or Hard Reset a Nokia N95 8GB
To perform a master Reset hard reset on your Hard Reset Nokia N95 you will need to:
Dial *#7370# and then enter your master code, by default it is 12345
NB: Performing a Master Reset Hard Reset on any Cell phone will Factory reset Master clear your cell phone and erase the cell phone completely including contacts, pictures, videos etc. The Nokia N95 Master Reset cannot be undone! The Nokia N95 Hard Reset cannot be undone! The Nokia N95 Factory Reset cannot be undone! The Nokia N95 Factory clear cannot be undone!
Read More..
Dial *#7370# and then enter your master code, by default it is 12345
NB: Performing a Master Reset Hard Reset on any Cell phone will Factory reset Master clear your cell phone and erase the cell phone completely including contacts, pictures, videos etc. The Nokia N95 Master Reset cannot be undone! The Nokia N95 Hard Reset cannot be undone! The Nokia N95 Factory Reset cannot be undone! The Nokia N95 Factory clear cannot be undone!
How to Hard Reset HTC Desire
How to Hard Reset HTC Desire
- press and hold back & home buttons
- press for a second power button
- now a white screen will appear and with 4 options
very easy to follow them - you would use volume buttons to make a choice
- then power button to confirm a choice
Wednesday, October 29, 2014
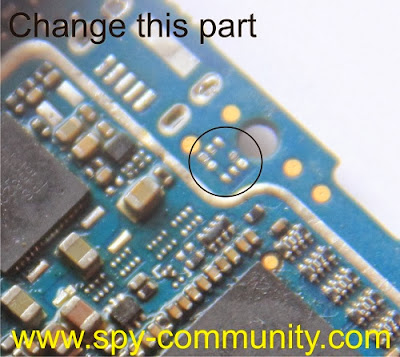
Nokia 2323 light problem solution keypad light lcd light solution
Nokia 2323 light problem can be due to water damages and carbon or rust.If you feel smell like burn rubber it may can be damages or components.Nokia 2323 light problem, lcd light problem, display light problem, led light problem, Keypad light problem.nokia 105 white lcd light problem solution

all above problems can be solved with these parts that are in line with red color in above diagram.Clean all these parts with electronics cleaner and apply hot air to dry these parts.
Do not apply much heat because it can harm your skin or damage the mother board or its parts.In diagram you can see a light coil and three leg ic. divot and some resistances and capestor.Check all these and resold them.
If only re flow and re sold can not solve light problem we have to replace these parts.Keep reading i will post some more light solution for Nokia 2323 without these parts only with jumpers soon…
for more detail and new tips and tricks about cellphone service problem keep visiting this page we will update cellphone service diagrams timely with new cellphone diagrams.some related post are also given bellow you can read them also for more information about cellphone.
Nokia N78 keypad malfunction solution with keypad filter IC jumper ways solution
Heres a solution that may help fix and repair Nokia N78 keypad failure or malfunction. If you already tried to replace the keypad flex cable but the problem still exists, this solution below will show you the keypad filter IC that is being connected to eah particular keys within the keypad matrix.
Nokia 2710NE Memory Card Solution - MicroSD Card not detected problem repair solution
 You may trace each particular line paths for deep keypad repair troubleshooting.
Nokia 2710NE Memory Card Solution - MicroSD Card not detected problem repair solution
N78 Keypad Filter IC connection tracks

How to Rooting HTC Dream G1 T Mobile G1
Rooting HTC Dream/G1/T-Mobile G1
Downgrading from RC30/RC9 and up
Format your phones SD card to FAT32 mode:- Hook your phone up to your computer using a USB cable and then wait for the notification to show up in your title bar of your phone.
- Click the notification, and then click "Mount".
- A new removable disk should show up on your computer. Right click it and select Format, and select FAT32 as the file system type.
- Download and unzip the RC29 or RC7 image file. Copy the DREAIMG.nbh file to the SD card. (RC29 for US, RC7 is for UK)
- Turn the device power off.
- Hold Camera button, and press Power button to entry bootloader mode. You should see a gray/white screen with instructions to flash your phone with the update on your SD card. If you dont see that, make sure you followed the instructions properly.
- As per the on-screen instructions, press the Power button to start upgrade procedure. DO NOT DO ANYTHING TO INTERRUPT THIS PROCESS.
- After it is finished, restart your phone by pressing the trackball button ("action button") and then press Call, Menu and End simultaneously.
- At the end of this process, youll now be running a build old enough to have the exploit we need to get root. Continue on with the next section.
Rooting RC29 and Lower
On RC29 phones and lower, a huge exploit existed where anything you typed into your keyboard was also being run in a hidden console with root permissions.- Download recovery.img and copy it to your SD card (see the previous section on how to copy from your computer to your Phones SD card).
- Download the Hard SPL and copy the zip file to the SD card.
- All files must be on the root of your SD card.
- Restart your phone. Wait for your phone to start up fully and show the home screen.
- After your phone starts up, type "telnetd" and press enter. (Yes, it will start up a contact search, dont worry. Just type it.)
- Download an Android "Telnet" application from the Market and connect to localhost.
- If you connect successfully, you will have a root prompt "#".
- Type the following into Telnet (these commands will give you root access easier in the future):
- mount -o rw,remount -t yaffs2 /dev/block/mtdblock3 /system
- cd sdcard
- flash_image recovery recovery.img
- cat recovery.img > /system/recovery.img
Next steps
Whether you gained root using RC29 or the downgrade method, the next steps are highly recommended. You will want to apply "Hard SPL" to your phone. HardSPL is what will allow you to apply flash images from other regions (like UK on US phones, and vice versa), create full backups of your phone, install the latest build from the Android source, and usually resurrect your phone if it is "bricked". You have already downloaded the file to your SD card, so now you can apply it.- Power off your phone.
- Start up in recovery mode by holding home and pressing power.
- You will now enter recovery mode. You should see an exclamation.
- If you do not see a menu on screen, press Alt-L to show the menu.
- Press Alt-S to apply the update from the SD card.
- After the update is complete, hold Home and press Back to restart.
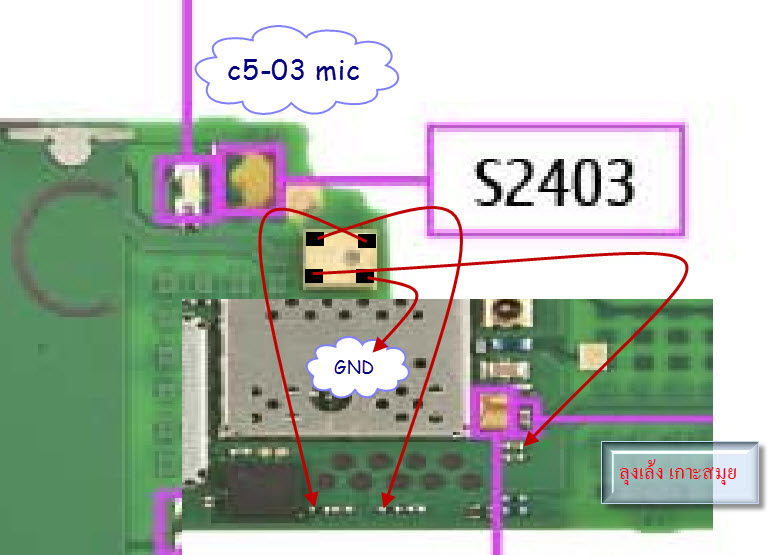
nokia C5 06 Mic problem solution jumper ways
If mic is not working in Nokia C5-06.You are facing Low mic voice or no mic voice problem.All these problems can be fix with a few tips and tricks that are given in this post.
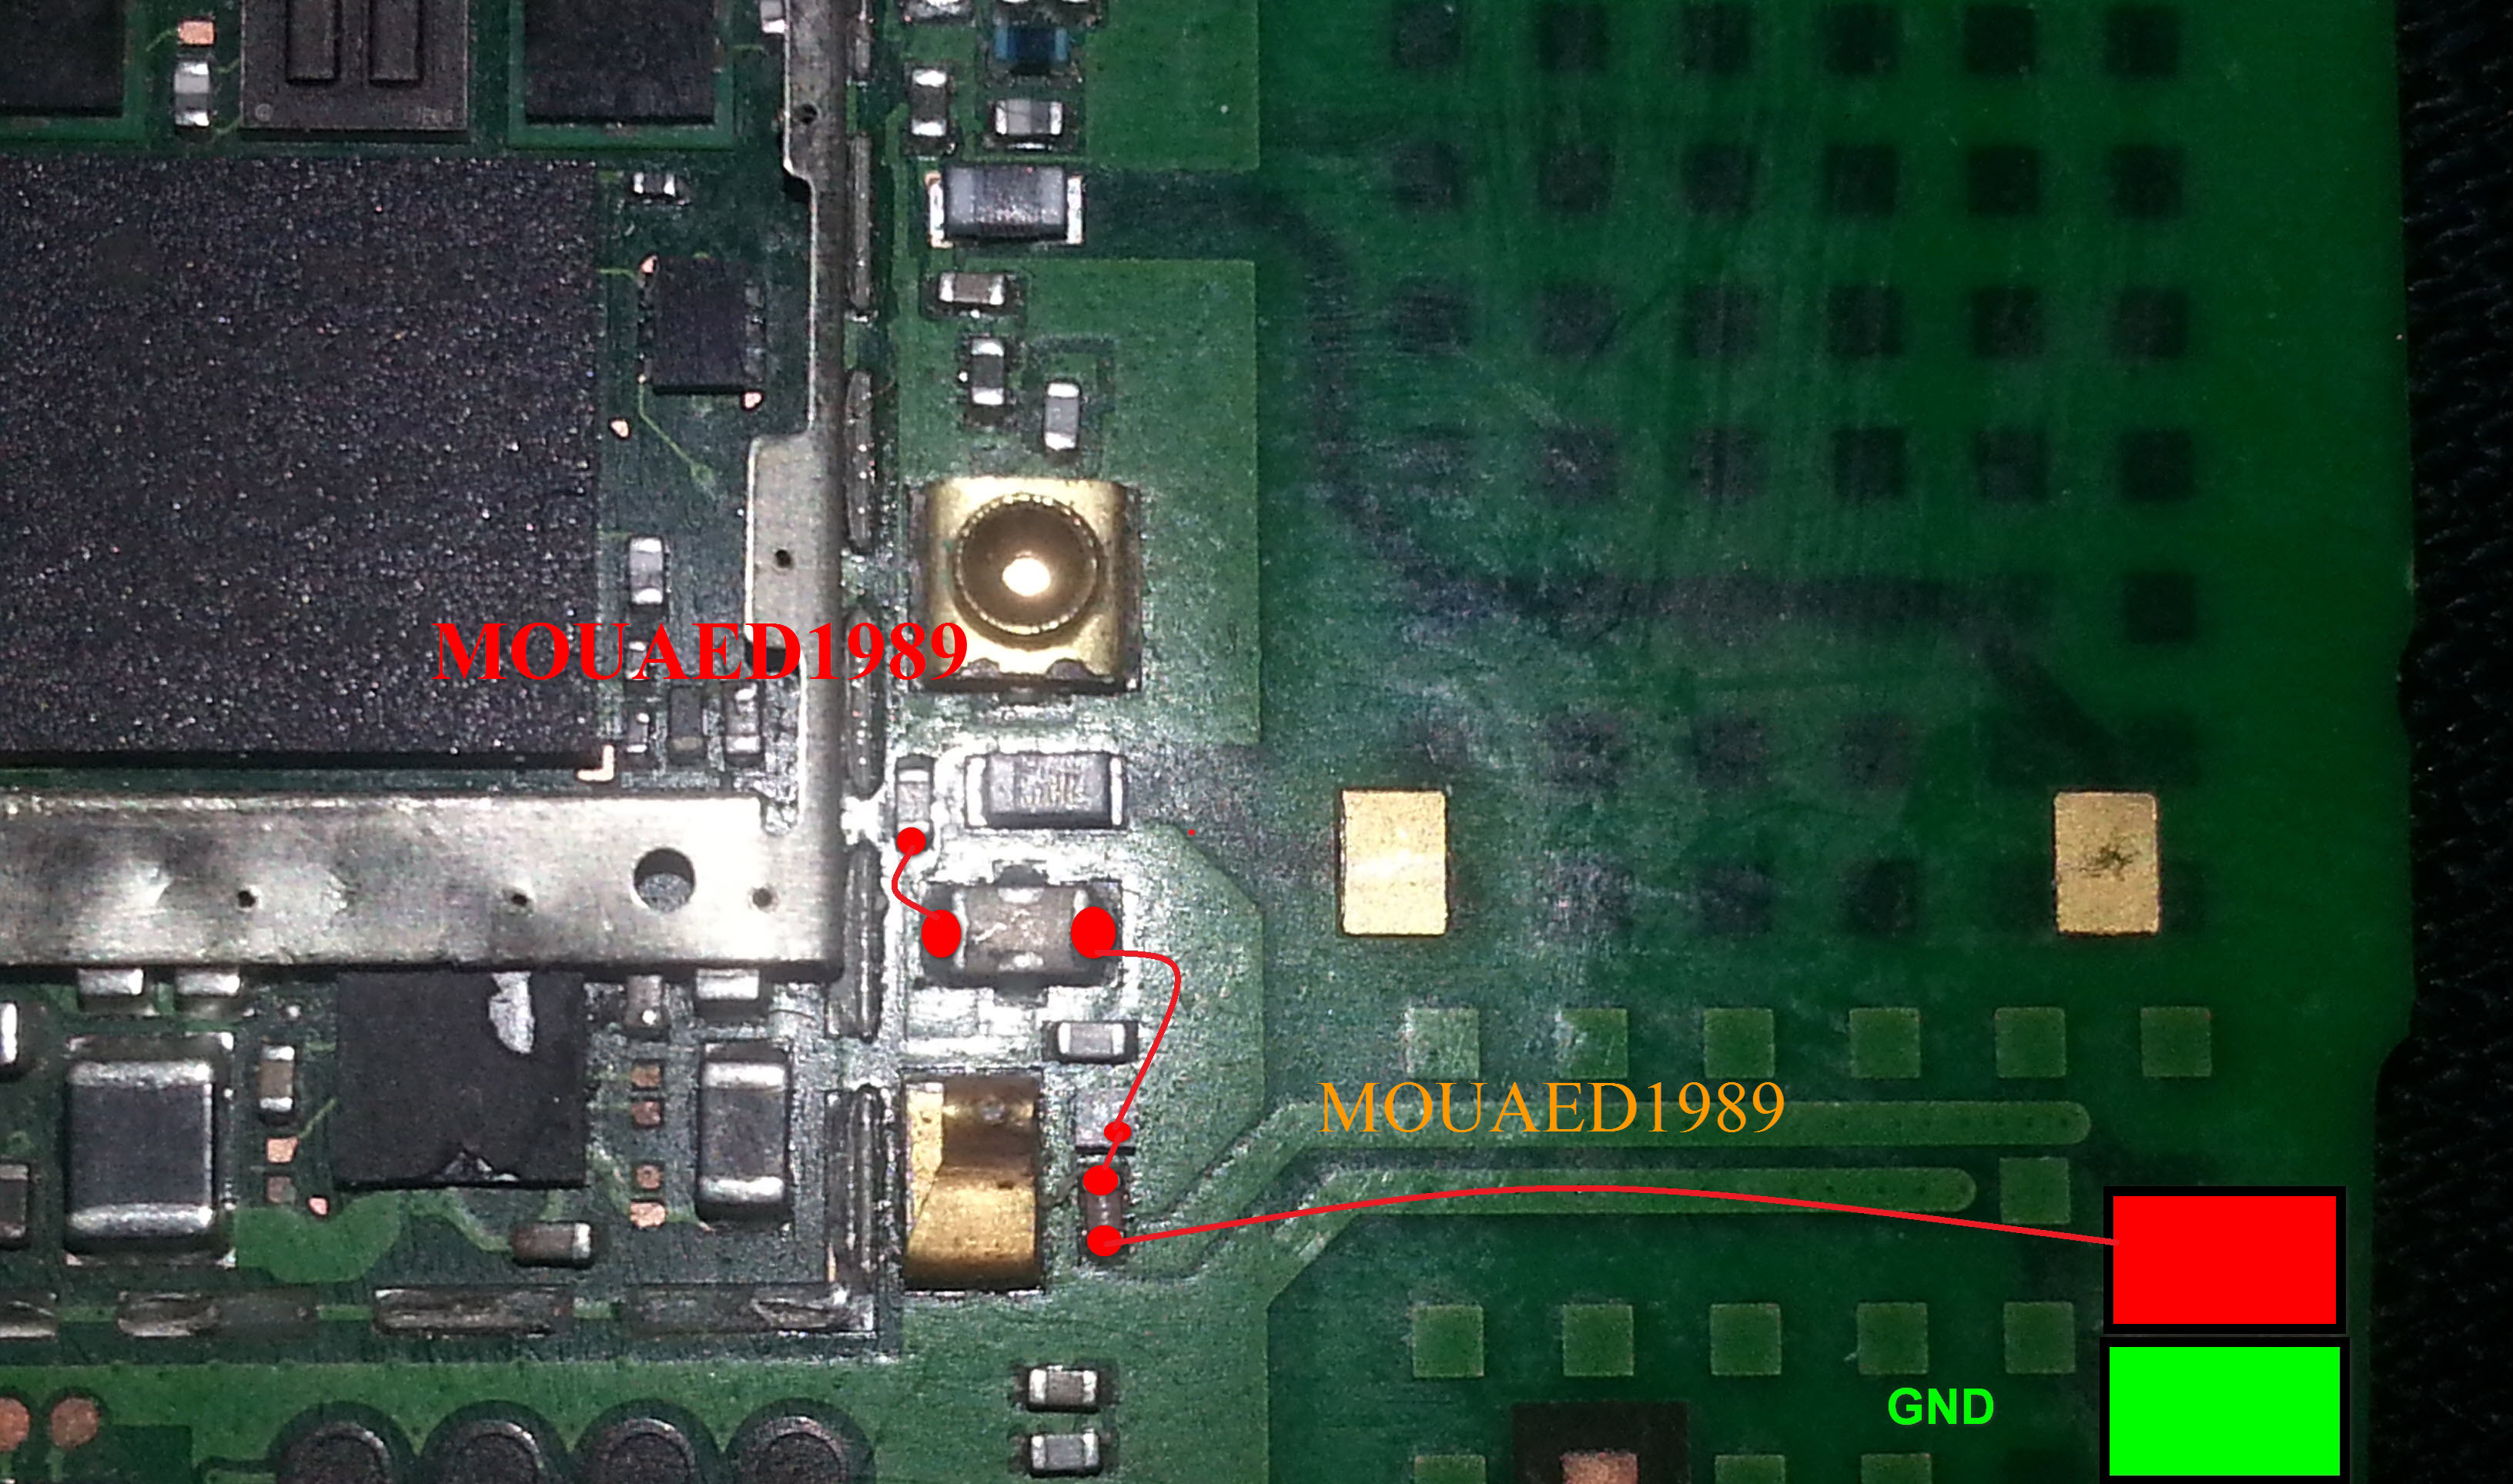
nokia Asha 202 Not charging problem solution jumpers

If you found some rust carbon or water damages then it can also be cause of Nokia C5-06 mic problem to solve and fix mic problem in Nokia C5-06 clean all the rust and carbon with electronics cleaner and apply hot air to make it dry.
In above diagram you can see a mic ( microphone ) and some red color lines. These lines are pointing the parts that are used in microphone mic functions in Nokia C5-06.
Check all these tracks and paths with meter and if any of them is missing apply jumpers as shown in above diagram.
for more detail and new tips and tricks about cellphone service problem keep visiting this page we will update cellphone service diagrams timely with new cellphone diagrams.some related post are also given bellow you can read them also for more information about cellphone.
Read More..
nokia Asha 202 Not charging problem solution jumpers
If you found some rust carbon or water damages then it can also be cause of Nokia C5-06 mic problem to solve and fix mic problem in Nokia C5-06 clean all the rust and carbon with electronics cleaner and apply hot air to make it dry.
In above diagram you can see a mic ( microphone ) and some red color lines. These lines are pointing the parts that are used in microphone mic functions in Nokia C5-06.
Check all these tracks and paths with meter and if any of them is missing apply jumpers as shown in above diagram.
for more detail and new tips and tricks about cellphone service problem keep visiting this page we will update cellphone service diagrams timely with new cellphone diagrams.some related post are also given bellow you can read them also for more information about cellphone.
Tuesday, October 28, 2014
Nokia C5 06 USB not charging Not detect problem solution jumpers
If Nokia C5-06 is not charging with usb or USB data cable can not detect. This problem can be cause of water damages carbon or burren. And may be due to usb jack damages.nokia Asha 202 Lcd display problem solution with jumpers

After dis assamble of Nokia C5-06 look at mother board and If you found some rust carbon or water damages then it can also be cause of Nokia C5-06 USB problem to solve and fix USB problem in Nokia C5-06 clean all the rust and carbon with electronics cleaner and apply hot air to make it dry.
In above diagram some different color lines are given to identify paths and tracks that are used for usb charging and usb data transfer in Nokia C5-06.Check all these paths tracks and parts components with meter. If any of them is missing apply jumpers as given in diagram.
for more detail and new tips and tricks about cellphone service problem keep visiting this page we will update cellphone service diagrams timely with new cellphone diagrams.some related post are also given bellow you can read them also for more information about cellphone.
Read More..

After dis assamble of Nokia C5-06 look at mother board and If you found some rust carbon or water damages then it can also be cause of Nokia C5-06 USB problem to solve and fix USB problem in Nokia C5-06 clean all the rust and carbon with electronics cleaner and apply hot air to make it dry.
In above diagram some different color lines are given to identify paths and tracks that are used for usb charging and usb data transfer in Nokia C5-06.Check all these paths tracks and parts components with meter. If any of them is missing apply jumpers as given in diagram.
for more detail and new tips and tricks about cellphone service problem keep visiting this page we will update cellphone service diagrams timely with new cellphone diagrams.some related post are also given bellow you can read them also for more information about cellphone.
Monday, October 27, 2014
Nokia 1280 Keypad Problem Solution Jumper Ways
Here a full solution for Nokia 1280 keypad problem. If encountered keypad failure on nokia 1280 the solution below might help fix and solve the problem, for it shows the complete connection line paths of each particular on nokia 1280 keyboard matrix.
The iner and outer key connection were all highlighted for easy tracks or tracing and check up procedures.
 There is a keypad controller chip that is mounted at the middle of the Nokia 1280 PCB board. If this chip become faulty or damaged, will totally result to keypad failure or malfunction. You may need to rework or replace the keypad controller chip if each of the connection line paths were all both okay.
The iner and outer key connection were all highlighted for easy tracks or tracing and check up procedures.
Nokia 1280 Keypad Problem Solution - Jumper Ways

Sunday, October 26, 2014
Nokia E73 Power ON OFF Switch Solution
Heres the solution for Nokia E73 Power ON and OFF Switch when damaged. This solution shows the connection line paths of Nokia E73 power switch and can be used where to apply or mend a jumper wire when the power switch terminal solder pads is already lifted or damaged.
Just refer to the solution below and trace the power ON OFF switch tracks.

The Nokia E733 power ON-OFF switch is connected to a 10K resistor this goes through to the power IC (GAZOO). The other terminal side of the 10K resistor is connected directly to the battery supply voltage which is 3.7 volts.
Just refer to the solution below and trace the power ON OFF switch tracks.
Nokia E73 Power ON OFF switch Jumper Ways

The Nokia E733 power ON-OFF switch is connected to a 10K resistor this goes through to the power IC (GAZOO). The other terminal side of the 10K resistor is connected directly to the battery supply voltage which is 3.7 volts.
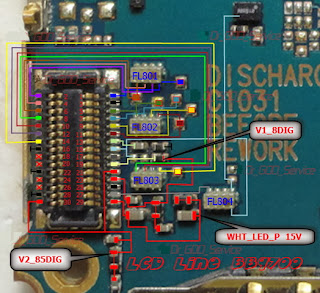
Nokia N97 mini white blue and blank screen display problem solution
A display problem like, white screen (WSOD), blue screen, blank or black screen, saturated and garbled screen displays, can be cause by a faulty or damaged LCD screen display and can be fix by installing anew LCD replacement on it. Sometimes an interrupted firmware also causes the problem and can be fix by restoring the device firmware. IF all of the above does not solved the problem you may then consider that the problem lies on the hardware components failures.
The solution below will show us a particular hardware components that holds and control the display data signals on Nokia N97 mini which enable the LCD screen to work.
 The LCD display connector may also cause the problem if being corroded and oxidation occurs, cleaning it first is a good idea.
If the device suffered like wet damaged, accidentally heavily dropped the display controller IC and its particular line paths may also possibly damaged. Reworking and tracing each corresponding line tracks will help fix display problem on Nokia N97 mini.
Read More..
The solution below will show us a particular hardware components that holds and control the display data signals on Nokia N97 mini which enable the LCD screen to work.
Nokia N97mini Display Problem solution

If the device suffered like wet damaged, accidentally heavily dropped the display controller IC and its particular line paths may also possibly damaged. Reworking and tracing each corresponding line tracks will help fix display problem on Nokia N97 mini.
Saturday, October 25, 2014
Nokia 5000 No Network Signal Problem Solution
Heres a solution to fix Nokia 5000 Signal problem related issues like no signal being intercepts, show a dropping signal on the display. This solution simply shows the location of the components and tests spots to check with when trying to fix nokia 5000 signal loss.

The solution picture guide indicated with numbers are the test spots and components might possibly get damaged if the signal loss occurs. In most cases the RF signal is loss or become weak if the RF IC and the RF power amplifier IC (PA IC) possibly damaged. You can check the corresponding power supply voltage first before attempting to rework or replace it with a new replacement spare component parts.

The solution picture guide indicated with numbers are the test spots and components might possibly get damaged if the signal loss occurs. In most cases the RF signal is loss or become weak if the RF IC and the RF power amplifier IC (PA IC) possibly damaged. You can check the corresponding power supply voltage first before attempting to rework or replace it with a new replacement spare component parts.
Friday, October 24, 2014
Blackberry 9700 9780 cellular phone lcd ways repair solution
blackberry 9700-9780 cellular phone lcd ways repair solution,blackberry 9700 cellular phone white display & Display ways solution if u have blackberry 9700 display problem this phone and u need this solution of display jumper solution i have working solution for jumper blackberry 9700 see this repair solution and working step by step i hope solved your phone display ways
blackberry 9700 Cellular Phone Keypad Repair Solution
this solution working for blackberry white display not show any picture blackberry all display ways here this jumper ways see this line and and try step by step ways i think solved your phone dispaly not working for blackberry white display solution
Thursday, October 23, 2014
Blackberry 9900 camera not working solution
Blackberry 9900 camera not working solution many water damage phone after camera on camera not working i have this problem 100% working solution for camera see this diagram and try step by step many phone tested this solution after phone on ok but camera on not open camera on full hang phone nay key not work i have tested solution see
Blackberry 9900 bt warless not working solution
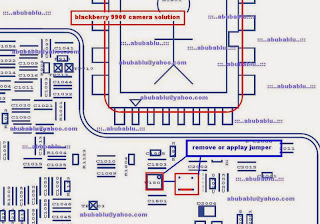
tested solution this diagram see red ic and remove this 2 ic only jumper 1 ic i think solved your phone camera problem mant time tested me this solution only try step to step solve your mobile phone blackberry 9900 camera problem and dont forget visit my blog.
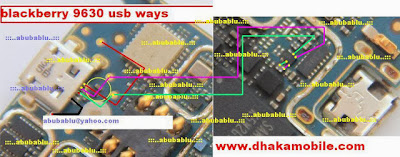
Blackberry 9630 cellular phone usb not connect repair solution
blackberry 9630 cellular phone usb not connect repair solution, blackberry 96300 cellular phone usb not charging phone repair solution,blackberry 9630 cellular phone usb ways repair jumper 100% tested solution ,blackberry 9630 cellular phone usb not show charging solution,blackberry 9630 cellular phone usb not connect repair solution if u have blackberry 9630 not show charging for connect charger i have good solution for charging blackberry if u need this solution see my diagram and try step to step i think done your phone 100% working changing and connect usb for your computer see this solution this solution working many problem for charging this solution work blackberry 9630 charging line jumper guide solution,blackberry 9630 jumper repair guide solution 100% tested line here see
Blackberry 9360 cellular phone Backlight Jumper Solution
line jumper guide try step by step many time working me this solution try this and many time solve me this solution and dont forget visit my blog.
Blackberry 8310 Short circuit Solution 100 tested solution
blackberry 8310 shot solution ,blackberry 8310 shot circuit solution 100% tested ,
blackberry 8310 full shot solution ,blackberry not on solution,blackberry not working power switch
solution ,blackberry full shot only change ic done solution ,blackberry 8310 power switch not working solution 100% tested solution,blackberry 8310 Rf Full Ways Jumper Solution
blackberry power not working solution only change this ic solved your problem many time tested me this problem.
Blackberry 9360 Cellular phone charging ways repair Solution
blackberry 9360 cellular phone charging ways repair solution,blackberry 930 cellular phone charging not working solution,blackberry 9360 cellular phone change not save solution,blackberry 9360 changing easy guide solution,Blackberry 9105 cellular phone keypad repair solution ,blackberry usb line damage solution,blackberry usb charging not save repair solution,blackberry 9360 usb not working 100% tested solution here ,blackberry 9360 usb jumper guide repair solution ,blackberry 9360 usb not recognize solution if u have blackberry phone usb not working solution i have this problem 100% tested solution if u need this solution see this diagram i hope solved your problem .
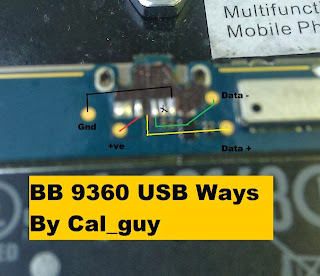
i have this solution this solution,blackberry 9360 usd jumper 100% tested solution ,blackberry usb charging jumper easy guide try my solution 100% tested this and dont forget my solution.
Blackberry 9630 Cellular Phone Lcd Light Repair Solution
blackberry 9630 cellular phone lcd light repair solution,if u have blackberry phone and this phone no have light if u need light solution blackberry 9630 i have this phone light solution many time tested solution this this solution working without ic only jumper done your phone blackberry 9630 light ic jumper solution ,blackberry light jumper ways blackberry light jumper repair guide here see this solution Blackberry 9320 Cellular phone USB & Charger ways Repair Solution
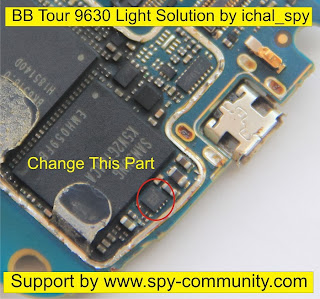
see this light ic 1st try to reheat and i hope solved your blackberry 9630 light problem not solve 2nd try to change this ic many time change me and success light solution dont forget visit my blog.
Wednesday, October 22, 2014
Samsung Galaxy Note 10 1 SHW M480S Running 4 1 2 Jelly Bean Firmware Simple Tutorial How to Root
If you are looking for an easy and working method to root your Samsung Galaxy Note 10.1 SHW-M480S (South Korea) Tablet, then youre on right place. Here youll find a simple step by step guide to root Galaxy Note 10.1 M480S running on Android 4.1.2 Jelly Bean official firmware. The device was released with Android 4..0.4 ICS and last updated to Android 4.1.2 Jelly Bean (Latest Firmware for Galaxy Note 10.1 M480S). If you own the device, then you can now root it using the below tutorial.
After having an Android Tablet or, after updating official firmware, many of us prefer to root our device to enjoy some additional features that unrooted android Tablet doesnt offer. With a rooted android Tablet, you can install apps that ask root permission, flash various custom ROMs, install MODs and tweak various features. Root removes default bloatware apps that free-up lots of memory space and extend the battery life. To know more about benefits of rooting android Tablet, read- Complete Note on What is Rooting and Benefits of Rooting Android Tablet.
 So, want to root your Galaxy Note 10.1 SHW-M480S? Continue reading this page to get all the necessary steps to successfully root your device. The root file (CF-Auto-Root) we used in this tutorial is safe and have nearly 100% success rate. Well use Odin software to flash the root file.
The tutorial is made with simple step by step guide, so that even an android newbie user can follow and successfully root his/her device. However, in this process you may loss your personal data and settings. So, we recommend you to follow all the backup instructions before proceed to rooting guide.
All the above pre-requisites are very important and must be followed before proceed to installation guide. Hope you get all the above points and done as mentioned. Now, you are ready to move to the final step of this tutorial where we have arranged a step by step details guide on how to root Galaxy Note 10.1 SHW-M480S running on official firmware.
After having an Android Tablet or, after updating official firmware, many of us prefer to root our device to enjoy some additional features that unrooted android Tablet doesnt offer. With a rooted android Tablet, you can install apps that ask root permission, flash various custom ROMs, install MODs and tweak various features. Root removes default bloatware apps that free-up lots of memory space and extend the battery life. To know more about benefits of rooting android Tablet, read- Complete Note on What is Rooting and Benefits of Rooting Android Tablet.
The tutorial is made with simple step by step guide, so that even an android newbie user can follow and successfully root his/her device. However, in this process you may loss your personal data and settings. So, we recommend you to follow all the backup instructions before proceed to rooting guide.
All the above pre-requisites are very important and must be followed before proceed to installation guide. Hope you get all the above points and done as mentioned. Now, you are ready to move to the final step of this tutorial where we have arranged a step by step details guide on how to root Galaxy Note 10.1 SHW-M480S running on official firmware.
How to Root Galaxy Note 10.1 SHW-M480S Running Android 4.1.2 Jelly Bean through Odin:

- Download CF-Auto-Root for Galaxy Note 10.1 M480S and extract the Zip file: CF-Auto-Root-p4noterfskt-p4noterfskt-shwm480s.zip
- Download Odin 3.07 and extract the Zip file: Odin 3.07.Zip
- Now, Switch off your Tablet and boot Galaxy Note 10.1 M480S into Download Mode by pressing and holding the Volume Down and Power buttons together (long press until the boot screen appear), now press Volume Up key to proceed to Download Mode.
- Run the Odin3 v3.07.exe file as an administrator (Right click on the .exe file and click on Run as administrator)
- Now connect your Galaxy Note 10.1 M480S to your computer via USB cable
- In Odin3 screen, you should see a COM Port number like “0:[COM7]” at ID:COM section and “Added!” text at the message box. This means your device has been detected by Odin3.
- Make sure that, only the “Auto Reboot” and “F. Reset Time” options are checked.
- Now, click on the PDA button and select the CF-Auto-Root-p4noterfskt-p4noterfskt-shwm480s.tar.md5 file.
- Finally, click on the Start button to begin the rooting process, wait few moments.
- Once completed, you would see “PASS!” message in ID:COM port having green background
- Your Tablet should automatically reboot after completion
- You can now disconnect your Tablet from computer
- Finish
I Phone 4 detailed explanation of the and how to deal with him 2 100 working solution
I Phone 4 detailed explanation of the and how to deal with him 2 100% working solution,I Phone 4 detailed explanation of the and how to deal with him 2 100% working solution,
I Phone 4 detailed explanation of the and how to deal with him 100% working solution

see this step i hope u think and i hope u have any idia,
Saturday, October 18, 2014
Unlock for LG KG800
Unlock for LG KG800
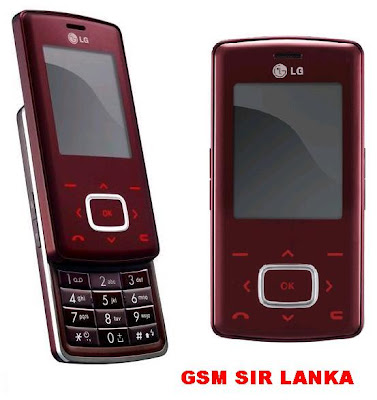 s::Unlock for KG800 (no Cables)::
To Unlock LG Chocolate.
1. Insert SIM . Turn on phone,
3. On home Screen, Slide up phone,
4. Type 2945#*#
5. ENG. Mode menu should appear,
6. Go Down to Factory Reset Select it, may take a few minutes to reset!
7. This will reset the phone back to before the phone was locked to a network,
8. The phone will automatically restart (Note the network logo at start up wont change),
9. Now insert any SIM card (Not tested with 3 SIM) and the phone should turn on normally,
10. The phone is now unlocked and you can customise setting as you like.
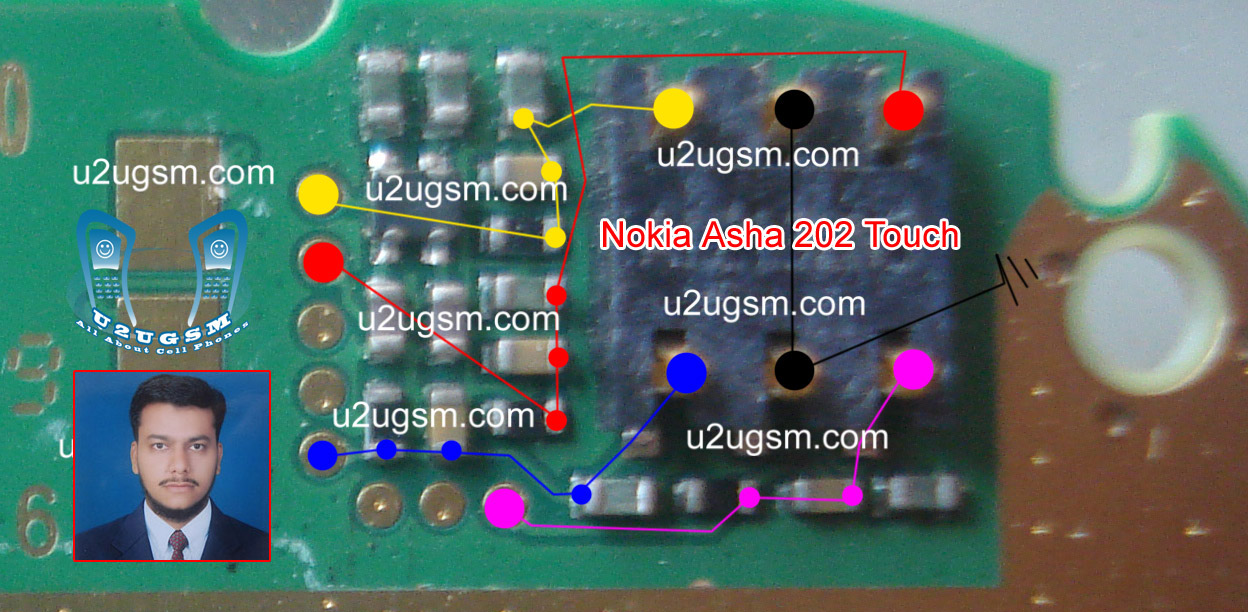
Nokia Asha 202 Touch Screen Solution Jumpers Problem Ways
Nokia asha 202 touch Lcd is not working we can not type with it.Although nokia asha 202 have also keypad but touch Lcd is easy to type fast. To solve touch Lcd problem of nokia asha I am posting this post that also have a diagram.nokia e52 100% tested fake charging solution

The above diagram contains some different color lines these are used for nokia asha 202 touchLcd function.You can find out if there is some rust carbon in it. Mother board can be water damage or may be you find out some burn parts in it.
In case of water damage clean the mother board and apply heat to make it dry. In case of burn or damage parts you can replace components.
Check all these tracks that are given in diagram for nokia asha 202 touchLcd problem solutions.Small circles in different colors are given so that you can find out points where you can apply jumpers and you can check these with meter.
If any link is broken apply jumpers to solve touch Lcd solution in nokia asha 202.
I all ready have posted an Nokia Asha 202 Touch Lcd IC problem solution you can check it also.
for more detail and new tips and tricks about cellphone service problem keep visiting this page we will update cellphone service diagrams timely with new cellphone diagrams.some related post are also given bellow you can read them also for more information about cellphone.
Read More..
The above diagram contains some different color lines these are used for nokia asha 202 touchLcd function.You can find out if there is some rust carbon in it. Mother board can be water damage or may be you find out some burn parts in it.
In case of water damage clean the mother board and apply heat to make it dry. In case of burn or damage parts you can replace components.
Check all these tracks that are given in diagram for nokia asha 202 touchLcd problem solutions.Small circles in different colors are given so that you can find out points where you can apply jumpers and you can check these with meter.
If any link is broken apply jumpers to solve touch Lcd solution in nokia asha 202.
I all ready have posted an Nokia Asha 202 Touch Lcd IC problem solution you can check it also.
for more detail and new tips and tricks about cellphone service problem keep visiting this page we will update cellphone service diagrams timely with new cellphone diagrams.some related post are also given bellow you can read them also for more information about cellphone.
Friday, October 17, 2014
HTC Aria Hard Reset
Note: Please back up all of your personal data before you proceed. All data will be deleted on your HTC Aria by doing this procedure. However, this process will NOT delete data stored on the microSD card.
1- Turn the power off. If your HTC Aria is frozen, pull the battery out and reinsert it
2-Hold the Volume Down button
3- Hold the Power button until the display turns on
4-You are now presented with a menu that allows for Fastbook, Recovery, Clear Storage, and Simlock
5- Select Clear Storage by pressing the Volume Down button
6.-Press and release the Power button to select.
7-Confirm: Volume Up for YES and Volume Down for NO.
Once the wipe is complete, the HTC Aria will reboot to its factory fresh state.and enjoy
Nokia X2 02 Speaker problem solution jumper ways
Nokia X2-02 speaker problem, Nokia X2-02 earpiece jumper ways, Nokia X2-02 mic is not working, Nokia X2-02 speaker jumpers, speaker is not working or low voice and noise.

If Nokia X2-02 speaker has low voice or nosie it can be problem of speaker ear piece. If no voice in it that may can be cause of missing or damage parts. The noise can also be due to water damages in Nokia X2-02.
If speaker is not working or have a low voice it can be fault of speaker and housing. Check Nokia X2-02 housing ( body ). All housing have a small whole at the point of ear piece. In some cases rust or dust cover this point and the voice can not reach proper to the mic point so make it clean if there is some dust on it.
After disassambly of Nokia X2-02 look at the motherboard for rust carbon or burren parts. If you found some rust or carbon apply electronics cleaner on the mother board and apply hot air to make it dry proper.
Applying too much heat can damage the mother board and parts.It also can be harm for your skin.So keep in mind about normal heat flow when making it dry.Nokia X2-05 Ringer Problem Solution Jumper Ways
Check all these tracks that are provided in above diagram to solve speaker problem in Nokia X2-02. In diagram two different color lines are given to identify all parts that are used to solve Nokia X2-02 speaker problem with jumpers.
If some parts are missing or damage apply jumper on these points where small circles are pointing in nokia mic repairing diagram above.
Nokia X2 05 On Off Power Button Jumper Ways Problem Solution
Nokia X2-05 is not getting power On and it can make charging. It is 100% fault of on off button in it.because On Off button on keypad is not working so that it will not be able to power On.
After disassambly of Nokia X2-05 look at the motherboard for rust carbon or burren parts. If you found some rust or carbon apply electronics cleaner on the mother board and apply hot air to make it dry proper.
Applying too much heat can damage the mother board and parts.It also can be harm for your skin.So keep in mind about normal heat flow when making it dry.Nokia X2-05 Mic problem solution jumper ways

Nokia X2-05 power button On Off switch not working ways jumpers.Replace battery and check if mobile can not be switch On dis assemble the phone and check power switch button ways as given in above diagram.If any print out of these is missing apply jumpers to solve On Off Button problem in Nokia X2-05 .
for more detail and new tips and tricks about cellphone service problem keep visiting this page we will update cellphone service diagrams timely with new cellphone diagrams.some related post are also given bellow you can read them also for more information about cellphone.
After disassambly of Nokia X2-05 look at the motherboard for rust carbon or burren parts. If you found some rust or carbon apply electronics cleaner on the mother board and apply hot air to make it dry proper.
Applying too much heat can damage the mother board and parts.It also can be harm for your skin.So keep in mind about normal heat flow when making it dry.Nokia X2-05 Mic problem solution jumper ways
Nokia X2-05 power button On Off switch not working ways jumpers.Replace battery and check if mobile can not be switch On dis assemble the phone and check power switch button ways as given in above diagram.If any print out of these is missing apply jumpers to solve On Off Button problem in Nokia X2-05 .
for more detail and new tips and tricks about cellphone service problem keep visiting this page we will update cellphone service diagrams timely with new cellphone diagrams.some related post are also given bellow you can read them also for more information about cellphone.
Thursday, October 16, 2014
Nokia C5 03 Not Charging Problem Solution Jumpers
If we want to solve not charging problem in Nokia C5-3 this diagram will help us to solve and fix this problem of charging in Nokia C5-03.Nokia C5-03 Insert Sim problem solution

In this diagram red color line is to identify that charging path of Nokia C5-03.In solution of charging problem of Nokia C5-03 we have to check a few things as given bellow.
Plug in charger into Nokia C5-03 charging pin.
If it did not show any notification it can be fault of charging pin. Fault of charger or due to some missing components.
If shows not charging notification it can be cause of values of components.
So after dis assamble of Nokia C5-03 check all these things which are given above to solve not charging problem in Nokia C5-03.
This diagram is sent to us by one of our guest poster and it is taken from gem-flash a gsm portal.
for more detail and new tips and tricks about cellphone service problem keep visiting this page we will update cellphone service diagrams timely with new cellphone diagrams.some related post are also given bellow you can read them also for more information about cellphone.
Wednesday, October 15, 2014
HTC Desire 816 Tips and Tricks
Here are some How Tos for your HTC Desire 816. These How Tos may still not yet complete and I am finding some time to work on the others:
How to Factory Reset (Hard Reset) HTC Desire 816
Resetting your HTC Desire 816 will restore the default settings of your device. It will also delete all your files on your phone, so it is recommended to have a backup of your important files on your computer. There are two ways on how to reset your HTC Desire 816 . It can be done through the settings or through the hardware buttons.
Resetting HTC Desire 816 on Settings:
- Slide the Notifications panel open, and then tap the Gear Icon or Settings.
- Select Backup & reset.
- Tap Reset phone.
- If you want to delete all your files, then tap Erase all data.
- Then tap OK to confirm.
These steps is also helpful when your HTC Desire 816 is unresponsive or frozen and theres no way to access the settings.
- First, press and hold the Volume Down button, and then do the same way on the Power button.
- Hold the two buttons until the three Android images appear on the Lcd.
- Release the button when the three Android images appear and press Volume Down.
- Tap on Factory Reset, and then press the Power Button to confirm.
Contacts is very important for everyone of us. We cant connect to our friends without a contact number. If you have a new phone, saving contacts on the phone one by one is so hassle. But now, theres an easy way how to transfer or import your contacts from your old phone to your new phone.
Use your PC to transfer contacts to your new phone. This process is applicable in several phone brands, including iPhone, Samsung, HTC and Nokia.
You just need an Internet Connection on your PC, your old and new phone and their own USB cable.
Then you need to install the PC Companion program. This is a free application and the installation files are already saved on your new phone. This program can also be used in updating your phone software.
Please note that if you are using the Microsoft Windows 7 operating system on your PC, make sure that the AutoPlay setting is enabled.
To check your settings:
Click Start > Control Panel, then type "autoplay" on the search box. Click the AutoPlay, and mark the check box Use AutoPlay for all media and devices.
Installing the PC Companion:
Installing the PC Companion:
- Turn on your new Phone and connect it to your PC.
- On your new Phone, tap "Install" to install PC Companion on the PC.
- On your computer, if a pop-up window that appears notifies you about available PC Software, select Run Startme.exe.
- Then click Install to start the installation and then follow the instructions to complete the installation.
If you are not prompted with a pop-up window to install the PC Companion, you can also download the PC Companion here.
Transferring your contacts to your new phone:
- Make sure that PC Companion is installed on your PC.
- Open the PC Companion application on your PC.
- Then click Contacts Setup and follow the instructions to transfer your contacts.
How to Send a Multimedia Message and Create a Slideshow on HTC Desire 816
Text messaging has grown its popularity over the years especially to younger generations. People, especially teens, prefer to communicate with friends and relatives thru texting instead of the traditional call. But whether your reaching out to friends thru text or a call, what matters most is the effort for still trying to keep in touch despite distance and even on busy schedules. We should be more grateful these days as it only takes minutes, even seconds, for a quick response unlike the old school snail mail. Now, everyone is just a text away. And more to that, you can even send multimedia messages (MMS) especially on special occasions to add more touch to a simple text-filled Lcd. Heres how you can send a MMS on HTC Desire 816.
1. On your devices homeLcd, tap on
 and go to Messages.
2. Then tap on

3. On the To Field, key in a contact name, mobile number or email address. You can also send it to a group of friends by tapping on

4. To add a subject line, tap on
 and go to Add Subject.
5. Tap on the box that says Add text and there you can type in your special message.
6. Choose an attachment for your message by tapping on

7. After you browse and select an attachment, tap on Send or press
 to save it as a draft. You can also tap on
 to see options like replacing, viewing and removing your attachment.
Now if you wish your Mutimedia Message to reach an extra mile, you can have it on a slideshow format. Heres how you can create one:
once again and select Slide.2. Then choose where you want to insert the next slide.
3. When youre done adding the next slide, you can either do the following:
- tap onand choose to add a video or a photo
- tap onand then audio if you want to add a voice recording or a music to the slide
- tap on Add Text to add a caption
- tap onto view options like replacing, viewing or removing your attachment.
select Preview. If you dont see Preview, scroll down the menu. To view the playback controls, tap once the preview Lcd.5. When its all set and done, press on or tap on Send to save message as a draft.
or tap on Send to save message as a draft.Now you can make someones day a very special one with this creative and personalize MMS.
How to Set HTC Desire 816 into Sleep Mode
How to Set HTC Desire 816 into Sleep Mode
Like any other device, setting HTC Desire 816 into sleep mode will somehow save its battery life. Sleep mode puts your device into a lower power state while the display is off. It also prevents accidental button presses when its in your pocket or bag. Heres how you can set HTC Desire 816 into sleep mode.
1. Briefly press on your devices Power button to turn off the display. Then switch to Sleep Mode.
2. To change the time before your device sleeps, just go to Display & buttons settings.
3. To wake it up, manually press the Power button and unlock your Lcd.
4. Your device will also automatically wakes up when you have an incoming call.
How to Extend Battery Life of HTC Desire 816
Battery Life depends on how you use your device. For HTC Desire 816 device, if you want to save your battery to last longer hours, you may need to adjust your settings. Follow these suggestions:
• Turn on the power-saving option on the device. Then lessen the Lcd brightness and the Lcd lock timeout.
1. Slide the Notifications panel open.
- You can also choose which phone features to conserve the power. Just tap the Power saver notification first before you turn power saver mode on.
2. To turn the power saver mode on or off, tap the check button next to the Power saver notification.
• Turn down your device volume with the volume keys.
• Close any apps or features when you are done using it so they will not continuously running in the background.
• Turn off the network connection if you are out of range so that your device will stop searching for a network signal.
• You should use the latest version of the software update. Software updates improves some features and fixes some bugs on the previous software version.
• Turn off the camera flash.
• The camera viewfinder can be a power drain, so after youve finished taking photos.
How to Take Continuous Camera Shots on HTC Desire 816
Want to take photos continuously on your HTC Desire 816? You just need to set the settings and you can now capture the moment of the action. Every movement of the action counts, so take the photo continuously.
Follow these steps:
1. First, make sure that youre in Normal scene to use this feature.
2. On the Viewfinder Lcd, just press and hold on .
.
- It should take 20 consecutive shots since it is the default settings.
- If you want to capture more than 20 shots, just tap on the Gear Icon or Settings, then Continuous shooting. After that, clear the Limit to 20 frames option.
3. You can also select the photo that you like most by tapping Best shot. If you dont want the other photos, then you can delete it.
How to Use HTC Zoe on HTC Desire 816
With HTC Zoe feature, your photo gallery will never be the same. It brings captured moments into life. This feature on HTC Desire 816 allows you to automatically capture 20 photos and a 3-second video once you press the shutter. You can now create a living photo album with HTCs ultrapixel camera that promises to quickly shoot vivid, true-to-life images even under low light conditions. Heres how to capture those memories with HTC Zoe.
1. On your devices Viewfinder Lcd, tap to switch HTC Zoe on.
2. Once youre ready to capture, just tap .
.
3. When the shutter release icon slowly turns to red , continue holding the phone steadily as it still captures a few seconds of shots.
Take note though that camera features like zooming is not available when youre using HTC Zoe feature. To add a little touch of creativity on those pictures, just open and edit them in the Gallery app.
Share what youre viewing on HTC Desire 816 onto a big Lcd TV.
About HTC Media Link HD
You can plug in HTC Media Link HD to any TV with HDMI port, and use it to display content wirelessly to your TV.
How to Check Battery Usage and History on HTC Desire 816
Keeping our phones at top shape at all times is a serious task. As much as possible, we try to save as much power as we can for our phones to last longer especially if were hitting the road. If youve noticed, here in Zakyri, we always make posts on our blog on ways to save a phones battery life. I might as well share these steps for all HTC Desire 816 users out there on how you can check battery usage on your phone. In this way you can see a ranking list of apps that are consuming up your battery life and even how long youve been using up your phone since the last charge. This is a pretty good information when you badly need to save up your battery life.
To check on each apps battery consumption:
1. On your homeLcd, slide the Notifications panel open.
2. Then tap
3. Choose and tap on Power and go to Usage.
4. And tap an app to check how its using up your phones battery and other use details.
If you see a button while viewing an apps battery use details, you can tap that button to adjust its settings that affect your battery usage, you can stop the app and more.
To check on your battery history
1. On your homeLcd, slide the Notifications panel open.
2. Then tap.
3. Choose and tap on Power and go to History.
4. Now swipe left or right ( or spread or pinch your fingers) to scale the graph that details your battery usage over the time.
How to Clear Call History on HTC Desire 816
Either your call logs are just piling up or you simply want to achieve a clean call history list, then you can do the steps below. Heres how to delete or clear call history on your HTC Desire 816 device.
To delete one name or number
1. On your devices Call History tab, press and hold the name or number you wish
to delete.
2. And tap Delete from call history.
To delete the entire call history list
1. On Call History tab, tapthen go to Remove call history.
2. On the Delete from call history Lcd, tap
3. Choose Select all and then tap Delete.
How to Hide Missed Calls and Messages on HTC Desire 816 LockLcd
Some mobile users want to check if theres any missed calls or messages right when they pick up their phone even if its locked. But if youre like me who prefers a clean lockLcd, free from missed calls and messages notification, then you might as well follow these steps to keep them hidden. Heres how you can hide those info on a HTC Desire 816 lockLcd.
1. First, slide the Notifications panel open.
2. Then tap .
.
3. Now go to Security.
4. And clear the Phone notification preview and Message notification
preview options to hide missed calls and messages on the lockLcd.
Now you can appreciate more how your phone looks like when its locked. Looking clean
and free.
How to Personalize HTC Desire 816 Launch Bar
A launch bar is a one stop hub on your homeLcd for commonly used apps. By personalizing your launch bar you can now have a one-touch access to apps that you often use. These apps and shortcuts on your launch bar are also what you see on the lockLcd. Heres how you can personalize your HTC Desire 816 launch bar.
1. On your devices homeLcd, tapto go to the All apps view.
2. Now press and hold the app you want to be replaced and then drag it out
of the launch bar.
3. Then press and hold an app you frequently use and drag it to the empty slot
on your launch bar.
If you have couple of apps to place on your launch bar, you can group them into
a folder and place them in the launch bar. Heres how you can group apps into
a folder.
1. On the All apps view of your device, press and hold an app and drag it over
to another app to automatically create a new folder for these apps.
2. To add more apps, press and hold an app and drag it to the folder.
3. Now drag the folder from the All apps view to the launch bar.
4. If you want to remove an app from a folder on the launch bar, you need to
switch first to the All apps view and then drag the app out of the folder.
Congratulations! You have just personalized your HTC Desire 816 launch bar with your favorite apps.
How to Set up Speed Dialing on HTC Desire 816
Speed dialing is definitely a must-have feature on any phones. Whether youre in a hurry or in an emergency, this feature lets you call important contacts right away by just dialing a number key on your phone. For all HTC Desire 816 users, heres how you can set up speed dialing on your device.
1. First, open the phone app on your device.
2. Then tapand go to Speed Dial.
3. Now tapand select a contact from the list.
4. On the Speed dial Lcd, choose the phone number of the contact to use
and a speed dial key to assign for that contact.
5. Once your done, tap Save.
Take note that the number 1 key is generally used and reserved for calling voicemail and retrieving voicemail messages.
How to Make Your HTC Desire 816 a Wireless Router
Smartphones these days can now share its mobile data connection and act as a portable Wi-Fi hotspot. And like those high-end gadgets, HTC Desire 816 is sure to let you experience the benefits of making it as a portable Wi-Fi hotspot. Heres how you can make your HTC Desire 816 phone the next Wi-Fi hotspot.
• Turn on the power-saving option on the device. Then lessen the Lcd brightness and the Lcd lock timeout.
1. Slide the Notifications panel open.
- You can also choose which phone features to conserve the power. Just tap the Power saver notification first before you turn power saver mode on.
2. To turn the power saver mode on or off, tap the check button next to the Power saver notification.
• Turn down your device volume with the volume keys.
• Close any apps or features when you are done using it so they will not continuously running in the background.
• Turn off the network connection if you are out of range so that your device will stop searching for a network signal.
• You should use the latest version of the software update. Software updates improves some features and fixes some bugs on the previous software version.
• Turn off the camera flash.
• The camera viewfinder can be a power drain, so after youve finished taking photos.
How to Take Continuous Camera Shots on HTC Desire 816
Want to take photos continuously on your HTC Desire 816? You just need to set the settings and you can now capture the moment of the action. Every movement of the action counts, so take the photo continuously.
Follow these steps:
1. First, make sure that youre in Normal scene to use this feature.
2. On the Viewfinder Lcd, just press and hold on
.- It should take 20 consecutive shots since it is the default settings.
- If you want to capture more than 20 shots, just tap on the Gear Icon or Settings, then Continuous shooting. After that, clear the Limit to 20 frames option.
3. You can also select the photo that you like most by tapping Best shot. If you dont want the other photos, then you can delete it.
How to Use HTC Zoe on HTC Desire 816
With HTC Zoe feature, your photo gallery will never be the same. It brings captured moments into life. This feature on HTC Desire 816 allows you to automatically capture 20 photos and a 3-second video once you press the shutter. You can now create a living photo album with HTCs ultrapixel camera that promises to quickly shoot vivid, true-to-life images even under low light conditions. Heres how to capture those memories with HTC Zoe.
1. On your devices Viewfinder Lcd, tap
to switch HTC Zoe on.2. Once youre ready to capture, just tap
.3. When the shutter release icon slowly turns to red
, continue holding the phone steadily as it still captures a few seconds of shots.Take note though that camera features like zooming is not available when youre using HTC Zoe feature. To add a little touch of creativity on those pictures, just open and edit them in the Gallery app.
How to Show Screen on TV With HTC Desire 816
Share what youre viewing on HTC Desire 816 onto a big Lcd TV.
- If you have a home theater system thats DLNA® compliant, you can share your photos, videos, movies, and music from HTC Desire 816 to your TV through your home Wi‑Fi network.
- Dont have a DLNA setup at home? Dont worry. Just purchase the HTC Media Link HD and hook it up to your HDMI TV. You can then wirelessly share what youre viewing or listening on HTC Desire 816 to your TV.
About HTC Media Link HD
You can plug in HTC Media Link HD to any TV with HDMI port, and use it to display content wirelessly to your TV.
Easy to set up and use
With just a three-finger swipe, connect HTC Desire 816 to HTC Media Link HD and share on the big Lcd.
Multitask with dual-Lcd display
HTC Media Link HD gives you dual-Lcd display when youre:
While youre playing media on the big Lcd, you can multitask and do other things such as take calls, browse the Web, or send email on HTC Desire 816.
Turns your TV into a digital photo frame
Use the TV Lcd saver feature to store up to 30 photos from HTC Desire 816 on HTC Media Link HD, and display them as a slideshow on your TV.
To find out more about setting up HTC Media Link HD and using it with HTC Desire 816, refer to the HTC Media Link HD user guide
With just a three-finger swipe, connect HTC Desire 816 to HTC Media Link HD and share on the big Lcd.
Multitask with dual-Lcd display
HTC Media Link HD gives you dual-Lcd display when youre:
- Viewing a video in Gallery
- Playing music in the HTC Music app
While youre playing media on the big Lcd, you can multitask and do other things such as take calls, browse the Web, or send email on HTC Desire 816.
Turns your TV into a digital photo frame
Use the TV Lcd saver feature to store up to 30 photos from HTC Desire 816 on HTC Media Link HD, and display them as a slideshow on your TV.
To find out more about setting up HTC Media Link HD and using it with HTC Desire 816, refer to the HTC Media Link HD user guide
How to Check Battery Usage and History on HTC Desire 816
Keeping our phones at top shape at all times is a serious task. As much as possible, we try to save as much power as we can for our phones to last longer especially if were hitting the road. If youve noticed, here in Zakyri, we always make posts on our blog on ways to save a phones battery life. I might as well share these steps for all HTC Desire 816 users out there on how you can check battery usage on your phone. In this way you can see a ranking list of apps that are consuming up your battery life and even how long youve been using up your phone since the last charge. This is a pretty good information when you badly need to save up your battery life.
To check on each apps battery consumption:
1. On your homeLcd, slide the Notifications panel open.
2. Then tap
3. Choose and tap on Power and go to Usage.
4. And tap an app to check how its using up your phones battery and other use details.
If you see a button while viewing an apps battery use details, you can tap that button to adjust its settings that affect your battery usage, you can stop the app and more.
To check on your battery history
1. On your homeLcd, slide the Notifications panel open.
2. Then tap
.3. Choose and tap on Power and go to History.
4. Now swipe left or right ( or spread or pinch your fingers) to scale the graph that details your battery usage over the time.
How to Clear Call History on HTC Desire 816
Either your call logs are just piling up or you simply want to achieve a clean call history list, then you can do the steps below. Heres how to delete or clear call history on your HTC Desire 816 device.
To delete one name or number
1. On your devices Call History tab, press and hold the name or number you wish
to delete.
2. And tap Delete from call history.
To delete the entire call history list
then go to Remove call history.2. On the Delete from call history Lcd, tap
3. Choose Select all and then tap Delete.
How to Hide Missed Calls and Messages on HTC Desire 816 LockLcd
Some mobile users want to check if theres any missed calls or messages right when they pick up their phone even if its locked. But if youre like me who prefers a clean lockLcd, free from missed calls and messages notification, then you might as well follow these steps to keep them hidden. Heres how you can hide those info on a HTC Desire 816 lockLcd.
1. First, slide the Notifications panel open.
2. Then tap
.3. Now go to Security.
4. And clear the Phone notification preview and Message notification
preview options to hide missed calls and messages on the lockLcd.
Now you can appreciate more how your phone looks like when its locked. Looking clean
and free.
How to Personalize HTC Desire 816 Launch Bar
A launch bar is a one stop hub on your homeLcd for commonly used apps. By personalizing your launch bar you can now have a one-touch access to apps that you often use. These apps and shortcuts on your launch bar are also what you see on the lockLcd. Heres how you can personalize your HTC Desire 816 launch bar.
1. On your devices homeLcd, tap
to go to the All apps view.2. Now press and hold the app you want to be replaced and then drag it out
of the launch bar.
3. Then press and hold an app you frequently use and drag it to the empty slot
on your launch bar.
If you have couple of apps to place on your launch bar, you can group them into
a folder and place them in the launch bar. Heres how you can group apps into
a folder.
1. On the All apps view of your device, press and hold an app and drag it over
to another app to automatically create a new folder for these apps.
2. To add more apps, press and hold an app and drag it to the folder.
3. Now drag the folder from the All apps view to the launch bar.
4. If you want to remove an app from a folder on the launch bar, you need to
switch first to the All apps view and then drag the app out of the folder.
Congratulations! You have just personalized your HTC Desire 816 launch bar with your favorite apps.
How to Set up Speed Dialing on HTC Desire 816
Speed dialing is definitely a must-have feature on any phones. Whether youre in a hurry or in an emergency, this feature lets you call important contacts right away by just dialing a number key on your phone. For all HTC Desire 816 users, heres how you can set up speed dialing on your device.
1. First, open the phone app on your device.
2. Then tap
and go to Speed Dial.3. Now tap
and select a contact from the list.4. On the Speed dial Lcd, choose the phone number of the contact to use
and a speed dial key to assign for that contact.
5. Once your done, tap Save.
Take note that the number 1 key is generally used and reserved for calling voicemail and retrieving voicemail messages.
How to Make Your HTC Desire 816 a Wireless Router
Smartphones these days can now share its mobile data connection and act as a portable Wi-Fi hotspot. And like those high-end gadgets, HTC Desire 816 is sure to let you experience the benefits of making it as a portable Wi-Fi hotspot. Heres how you can make your HTC Desire 816 phone the next Wi-Fi hotspot.
- Slide the Notifications panel open, and then tap the Gear Icon or Settings.
- Under Wireless & Network, tap More.
- Select Mobile network sharing > Portable Wi-Fi hotspot settings.
- Enter your preferred router name, or you can also use the default name.
- Choose the type of security and set a password for your wireless router. (If you selected none, then you dont have to enter a password.)
- Select the Portable Wi-Fi Hotspot option to turn on the wireless router.
When you see the router wireless icon, then your HTC Desire 816 is ready to be used as a router.
Tuesday, October 14, 2014
Nokia 111 light problem solution with jumpers
problem is not lcd display light and keypad light also not getting on lighten.it is common fault of lcd pin 2 and 3.in diagram given bellow you can find these two lines with color so make jumper as shown in diagram.

on lcd prints strip can be scratched vary carefully and slightly so that it can be sold easily and then you can make jumper as i told above.
for more detail and new tips and tricks about cellphone service problem keep visiting this page we will update cellphone service diagrams timely with new cellphone diagrams.some related post are also given bellow you can read them also for more information about cellphone.
Subscribe to:
Posts (Atom)
