Showing posts with label with. Show all posts

Thursday, December 18, 2014

BlackBerry 8310 with Damage Repair Camera


BlackBerry 8310 with Damage Repair Camera
Read More..

Saturday, November 8, 2014

chinese phones with second sim problem


chinese phones with second sim problem

Read More..

Sunday, November 2, 2014

Nokia N92 Full Keypad Solution With keypad IC Jumper Ways solution

Heres a full keypad solution that may useful and possibly help fix and repair Nokia N92 keypad problem or failure. If any certain keys will not been able to function this solution will show you each keypad keys line tracks and connections, including the keypad filter IC that may also cause the keypad keys failed to function if damaged or faulty. 
Nokia N92 Keypad Keys Malfunction Solution
Nokia
 Nokia N92 keypad IC jumper ways

There are two keypad ESD filter is being used on the keypad circuit of Nokia N92, (see solution above).
The small keypad IC holds the volume UP and DOWN control and the Camera Shutter button, and some  group of keys.
The bigger one holds all the keypad keys, if this keypad filter IC is damaged all of the key will not respond or unable to function. By only replacing it with a new one will only possibly fix or repair the keypad problem on Nokia N92.
Read More..

Wednesday, October 29, 2014

Nokia N78 keypad malfunction solution with keypad filter IC jumper ways solution

Heres a solution that may help fix and repair Nokia N78 keypad failure or malfunction. If you already tried to replace the keypad flex cable but the problem still exists, this solution below will show you the keypad filter IC that is being connected to eah particular keys within the keypad matrix.

Nokia 2710NE Memory Card Solution - MicroSD Card not detected problem repair solution

N78 Keypad Filter IC connection tracks
You may trace each particular line paths for deep keypad repair troubleshooting.
Read More..

Wednesday, October 22, 2014

I Phone 4 detailed explanation of the and how to deal with him 2 100 working solution

I Phone 4 detailed explanation of the and how to deal with him 2 100% working solution,I Phone 4 detailed explanation of the and how to deal with him 2 100% working solution,
I Phone 4 detailed explanation of the and how to deal with him 100% working solution
 see this step i hope u think and i hope u have any idia,
Read More..

Tuesday, October 14, 2014

Nokia 111 light problem solution with jumpers

problem is not lcd display light and keypad light also not getting on lighten.it is common fault of lcd pin 2 and 3.in diagram given bellow you can find these two lines with color so make jumper as shown in diagram.

on lcd prints strip can be scratched vary carefully and slightly so that it can be sold easily and then you can make jumper as i told above.
for more detail and new tips and tricks about cellphone service problem keep visiting this page we will update cellphone service diagrams timely with new cellphone diagrams.some related post are also given bellow you can read them also for more information about cellphone.
Read More..

Sunday, September 14, 2014

Nokia 6303c keypad Problem with Jumper Solution

Nokia 6303c keypad solution.
Nokia
Read More..

Wednesday, September 10, 2014

Easy Ways to Update Galaxy S4 Mini I9190 with Android 4 2 2 DXUAMK 2 Jelly Bean Official Firmware

For Samsung Galaxy S4 Mini with Model Number GT-I9190 has been getting updates Jelly Bean Android 4.2.2 with the latest firmware base I9195XXUBML1. The new firmware is now officially available as an Over-The-Air (OTA) and via the Samsung Kies update.


Firmware details
PDA: I9190DXUAMK2
CSC: I9190OLBAMK3
MODEM: I9190DXUAMK2
Version: Android 4.2.2
Build date: Nov 11, 2013
Regions: Indonesia, Malaysia, Singapore, Vietnam, Thailand

Samsung Galaxy S4 Mini I9190 users who missed the OTA update notification or unable to access the update over Samsung KIES, may follow our step-by-step guide to install the update manually.

Pre-requisites
1. Install USB Drivers for Samsung Galaxy S4 Mini on the computer.
2. Enable USB Debugging Mode on the phone by navigating to Settings >> Developer Options.
3. Make a backup of all your important data before following the guide.
4. The Galaxy S4 Mini should be factory unlocked and not locked to any particular carrier.
5. Ensure the battery of the phone is charged more than 80 percent.
6. The Android 4.2.2 DXUAMK2 Jelly Bean firmware is compatible only with the 3G version of the Samsung Galaxy S4 Mini (GT-I9190). Applying this to any incorrect variant might brick the device. Verify the model number of the Galaxy S4 Mini by navigating to Settings >> About Phone.

Files Required

1. Android 4.2.2 DXUAMK2 Jelly Bean Firmware for Galaxy S4 Mini I9190
2. Odin 3.07

Steps to Update Galaxy S4 Mini I9190 with Android 4.2.2 DXUAMK2 Jelly Bean Firmware
Step 1: Extract Firmware zip file using winrar/7zip/winzip or any other extracting tool, you will get a .tar.md5 file and some other files.
Step 2: Extract Odin zip file and you will get Odin3 v3.07.exe along with few other files.
Step 3: Switch off the Galaxy S4 Mini.
Step 4: Boot the device into Download Mode by pressing and holding Volume Down, Homeand Power buttons together until a construction Android robot icon with a warning triangle appears on Lcd. Now press the Volume Up button to enter Download Mode.
Step 5: Run Odin on the computer as an Administrator.
Step 6: Connect the Galaxy S4 Mini to the computer using USB cable while it is in the Download Mode. Wait until Odin detects the device. When the device is connected successfully, the ID: COM box will turn to light blue with the COM port number. Additionally, the successful connected will be indicated by a message saying Added.

Note: If the Added message does not appear, then try re-install USB drivers or changing the port on the computer.
Step 7: Select the following files in Odin from extracted I9190DXUAMK2 firmware folder:
  • Click the PDA button and select the .tar.md5 file.
  • Click the Phone button and select file with MODEM in its name. Ignore if there is no such file.
  • Click the CSC button and select file with CSC in its name. Ignore if there is no such file.
  • Click the PIT button and select the .pit file. Ignore if there is no such file.

Step 8: In Odin, enable Auto Reboot and F. Reset Time checkboxes. Also, ensure the Re-Partition checkbox is chosen only if a .pit file was chosen in the previous step.
Step 9: Verify everything suggested in Step 7 and Step 8 is done correctly. Then hit the Startbutton to begin the installation process.
Step 10: Once the installation process is completed, your phone will restart and soon you will see a PASS message with green background in the left-most box at the very top of the Odin. You can now unplug the USB cable to disconnect it from the computer.

Samsung Galaxy S4 Mini I9190 should be now updated with official Android 4.2.2 DXUAMK2 Jelly Bean. Head over to Settings >> About Phone to verify the software version running on the device.

Note: If Galaxy S4 Mini I9190 stuck at booting animation after Step 10 then go to recovery mode (press and hold the Volume Up, Home and Power buttons together) and perform Wipe data/Factory Reset and Wipe Cache Partition task before selecting reboot system now function. In recovery mode use Volume keys to navigate between options and Power key to select the option. Please note, performing wiping task will erase your device internal memory data and not external SD card data.
Read More..

Sunday, September 7, 2014

Nokia 5530 Mic Problem with Jumper Solution

Nokia 5530 Xpress music Mic solution.
Nokia
Read More..

Friday, September 5, 2014

Nokia 6301 Mic Problem with Jumper Solution

Nokia 6301 Mic solution here.
Nokia
Read More..

Monday, September 1, 2014

Tablet T733 MAINBORD v2 0 Update Done To 4 2 1 With Orginal Rom

Tablet -T733 MAINBORD-v2.0 Update Done To 4.2.1 With Orginal Rom
PCB ID -T733 Mainboard v2.0 , 2013/07/01

T733 MAINBORD-v2.0 : Rom Link1

Flashing Done


PCB IMAGE
Read More..

Saturday, August 30, 2014

Nokia 5230 Lcd Problem with Jumper Solution

Nokia 5230 Lcd solution.
Read More..

Sunday, August 24, 2014

How to Update Samsung Galaxy Mega 6 3 I9200 with Android 4 4 2 XXUDNE4 KitKat Official Firmware Using Odin Guide


Samsung Galaxy Mega 6.3 with model number GT-I9200 has started receiving Android 4.4.2 KitKat update with firmware build number I9200XXUDNE4. The new official firmware is currently available as an Over-The-Air (OTA) update as well as through Samsung KIES.
Firmware details
PDA: I9200XXUDNE4
CSC: I9200SERDNE4
MODEM: I9200XXUDNE4
Version: Android 4.4.2
Build date: May 21, 2014
Regions: Russia
Samsung Galaxy Mega 6.3 I9200 users who missed the OTA update notification or unable to access the update over Samsung KIES, can now download and install the same manually using our step-by-step guide.
Pre-requisites
1. Install USB Drivers for Samsung Galaxy Mega 6.3 on the computer.
2. Enable USB Debugging Mode on the phone by navigating to Settings >> Developer Options.
3. Make a backup of all your important data before following the guide.
4. Ensure the battery of the phone is charged more than 80 percent.
5. The Android 4.4.2 XXUDNE4 KitKat firmware is compatible only with the 3G version of Samsung Galaxy Mega 6.3 (GT-I9200). Applying this to any incorrect variant might brick the device. Verify the model number of the Galaxy Mega 6.3 by navigating to Settings >> About Phone.
Files Required
1. Android 4.4.2 XXUDNE4 KitKat Firmware (Mirror Link) for Galaxy Mega 6.3 I9200
2. Odin 3.07
Steps to Update Galaxy Mega 6.3 I9200 with Android 4.4.2 XXUDNE4 KitKat Firmware
Step 1: Extract Firmware zip file using WinRAR/7-Zip/WinZip or any other extracting tool, you will get a .tar.md5 file and some other files (optional).
Step 2: Extract Odin zip file and you will get Odin3 v3.07.exe along with few other files.
Step 3: Switch off the Galaxy Mega 6.3.
Step 4: Boot the device into Download Mode by pressing and holding Volume Down, Home and Power buttons together until a construction Android robot icon with a warning triangle appears on screen. Now press the Volume Up button to enter Download Mode.
Step 5: Run Odin on the computer as an Administrator.
Step 6: Connect the Galaxy Mega 6.3 to the computer using USB cable while it is in the Download Mode. Wait until Odin detects the device. When the device is connected successfully, the ID: COM box will turn to light blue with the COM port number. Additionally, the successful connected will be indicated by a message saying Added.
Step 7: Select the following files in Odin from extracted I9200XXUDNE4 firmware folder:
  • Click the PDA button and select the .tar.md5 file.
  • Click the Phone button and select file with MODEM in its name. Ignore if there is no such file.
  • Click the CSC button and select file with CSC in its name. Ignore if there is no such file.
  • Click the PIT button and select the .pit file. Ignore if there is no such file.
Step 8: In Odin, enable Auto Reboot and F. Reset Time checkboxes. Also, ensure the Re-Partition checkbox is chosen only if a .pit file was chosen in the previous step.
Step 9: Verify everything suggested in Step 7 and Step 8 is done correctly. Then hit the Start button to begin the installation process.
Step 10: Once the installation process completes, your phone will restart and soon you will see a PASS message with green background in the left-most box at the very top of the Odin. You can now unplug the USB cable to disconnect your device from the computer.
Samsung Galaxy Mega 6.3 I9200 should be now updated with Android 4.4.2 XXUDNE4 KitKat official firmware. Head over to Settings >> About Phone to verify the software version running on the device.
Note: If Galaxy Mega 6.3 I9200 stuck at booting animation after Step 10 then go to recovery mode (press and hold the Volume Up, Home and Power buttons together) and perform Wipe data/Factory Reset and Wipe Cache Partition task before selecting reboot system now function. In recovery mode use Volume keys to navigate between options and Power key to select the option. Please note, performing wiping task will erase your device internal memory data and not external SD card data.

Read also: How to Root Galaxy Mega 6.3 I9200/I9205 on Android 4.2.2 Jelly Bean Firmware
Read More..

Tuesday, August 19, 2014

How to Root Samsung Galaxy S3 I9300 Android 4 1 2 With Guide

Just a month back Samsung released a minor 40 MB update for Samsung Galaxy S3 I9300 running Android 4.1.2 (  Feels bad stuck on Android 4.1.2 for ages ) , Officially there were no change logs provided for the update but we can assume that it was probably an minor performance  upgrade . As it is with installing an Official software update , My Samsung galaxy S3 was unrooted in this process .
Once again i had to source for the latest CF auto root and Odin to root my Samsung galaxy S3 . In fact i even tried Framaroot which had previously worked on my Samsung galaxy S3 , but after the update Framaroot was unable to root my Galaxy S3 . So the only option i had left was to root my Samsung Galaxy S3 through Odin .
If you had installed the same update , then follow the instructions below to manually root your Samsung Galaxy S3 I9300 using Odin and CF-Auto-Root by Chainfire .
NOTE: This guide is only for users having the international version of the Samsung Galaxy S3 I9300 .

Instructions to Root Samsung Galaxy S3 using Odin

  • Step 1: Download CF-Auto-Root and Odin from the links below :
Download CF-Autoroot
Download Odin ( Use Odin 3.07 from this package )
  • Step 2: Install Odin on your PC and run it as Administrator . Now lets prepare your phone for rooting .
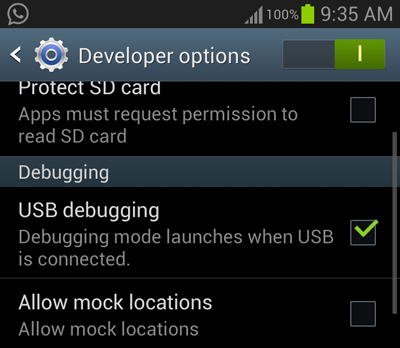
  • Step 3: Enable USB debugging in your phone . To enable USB debugging navigate to Settings > System > Developer options > Debugging > USB debugging .
turn
  • Step 4: Turn off your phone and turn on your phone into download mode by pressing the Volume down + Home + Power keys together . When your phone displays a warning , press the Volume up button to continue into Download mode .
  • Step 5: Connect your Samsung galaxy S3 to your PC using a Data cable .
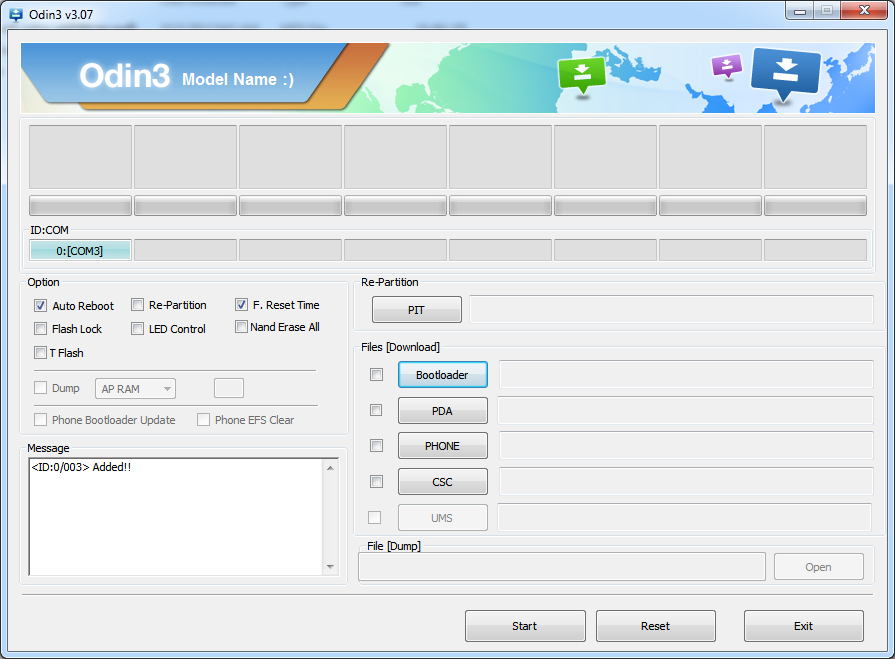
  • Step 6: You should now see the Odin’s ID:COM status change into blue and an Added message will be displayed .
  • Step 7: Check Auto reboot and F.Reset options in Odin .
Samsung
  • Step 8: Click on the PDA button and select the CF-Autoroot file .
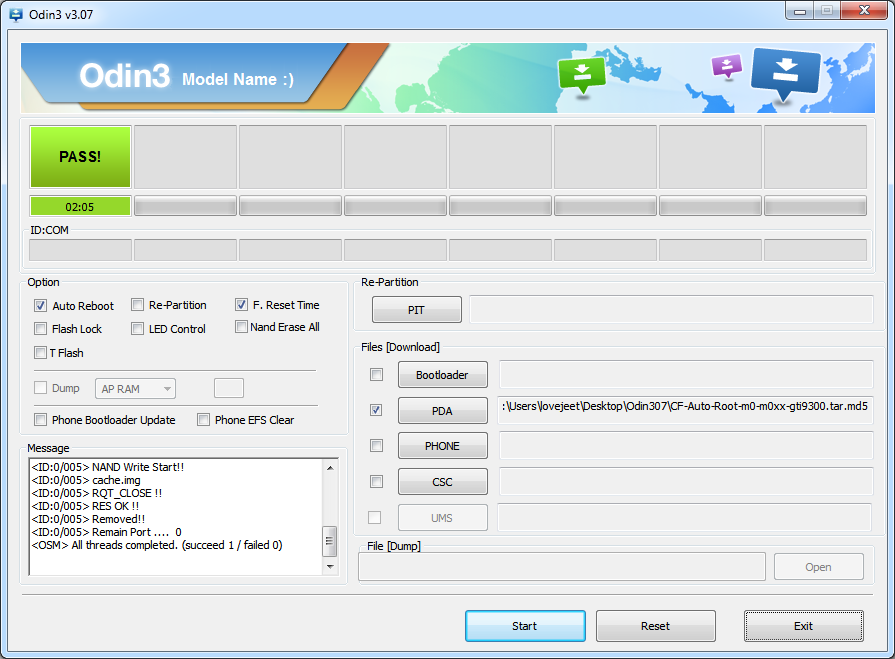
  • Step 9: Double check all the instructions above and Click Start to Root your Samsung Galaxy S3 . Wait for a few minutes and you will see a Success message as below :
rooting
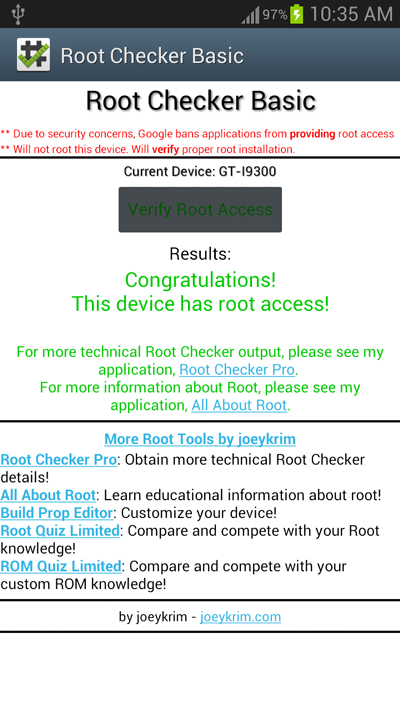
If you want to confirm whether your Samsung Galaxy S3 is rooted not then Install the Root checker app from the Google play store .Here is a screenshot of root checker app on my Samsung Galaxy S3 .
samsung

Incoming search terms:

  • how to root samsung galaxy s3
  • how to root galaxy s3
  • root galaxy s3
  • how to root s3
  • root samsung galaxy s3
Read More..

Monday, August 18, 2014

II Tutorial II Create PhoenixCard Allwinner Chip Script Update With SD Card By Azim

II-Tutorial-II-Create PhoenixCard-Allwinner Chip Script Update With SD Card
III-Tutorial-III
How To Create PhoenixCard
How Allwinner Chip Script Update Using SD Card

Friends,
Please Post About Thread Title
If Any One Feel Problem Post Here I Will Reply You
Only Post About This Thread Title


Use Thanks Button If You Like To Use & Care Forum Rules

Ha Ha Ha
No Need Bootkey , Usb , PhoenixSuit & LiveSuit.exe
Update Your Allwinner Chip Using SD Card
Also
For This Not Require Any Mode
Just On Your Tab & Start Update (Auto)
Lest See Tutorial
With Tested Report

How To Create PhoenixCard Using PhoenixCard.exe

Open Your PhoenixCard.exe
Click To DiskCheck Then Select Your Disk (Memory Drive)

PhoenixCard-Allwinner

Click To IMG File & Select Your .IMG (Image) File
PhoenixCard-Allwinner

Screenshots Number 3 Gide By AzimBahar ..::One-Man::..

PhoenixCard-Allwinner

Click To Normal Format & Wait ...After Format Success Click To Ok

PhoenixCard-Allwinner

Click To Brun & Wait For Brun Done
PhoenixCard-Allwinner

Brun Done , Now Your PhoenixCard Is Ready Card Create Done For Update
PhoenixCard-Allwinner
Read More..

Saturday, August 16, 2014

Nokia 2220s camera Problem with Jumper Solution

Nokia 2220s camera solution.
Read More..

Nokia 2700c local mode test mode Problem with Jumper Solution

Nokia 2700c local mode .test mode solution.
2700c local mode .test mode
Read More..

Thursday, August 14, 2014

Nokia C1 01 Light Problem with Jumper Solution

Nokia C1-01 Light solution.
Read More..

Wednesday, August 13, 2014

Nokia 6303c light Problem with Jumper Solution

Nokia 6303c light solution.
Nokia 6303c light solution
Read More..