Showing posts with label s3. Show all posts
Showing posts with label s3. Show all posts
Thursday, November 20, 2014
How to update Samsung Galaxy S3 to Android 4 1 2 Jelly Bean
Good news to all Samsung galaxy s3 users, the international version of Samsung galaxy s3, which have been the world’s best-selling smartphone, now already received the much anticipated Android 4.1.2 Jelly Bean update over-the-air. Many major national carriers has released Android Jelly for the device, and other Carrier-branded versions like Verizon Wireless should be able to receive the update soon as Samsung is railroading updates for its devices. But some only offer an update that must completed via Samsung Kies software and is not offered over the air.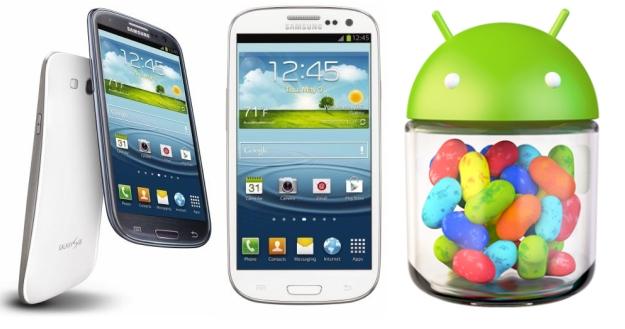
The new Android 4.12 Jelly Bean Update brings a list of amazing features now only located in Samsung Galaxy Note 2 to Samsung S3, like highly-anticipated Multi View multitasking system, Smart Rotation function , camera filters, low-light photo mode, an easy mode and so on. For some people you may find it is difficult for you to update or wait any longer. So here I will show you How to update Android 4.1 Jelly Bean on Galaxy S3 immediately.Pre-requisites
Heres How to Update Your AT&T Samsung Galaxy S III to Android 4.1 Jelly Bean
Read More..
The new Android 4.12 Jelly Bean Update brings a list of amazing features now only located in Samsung Galaxy Note 2 to Samsung S3, like highly-anticipated Multi View multitasking system, Smart Rotation function , camera filters, low-light photo mode, an easy mode and so on. For some people you may find it is difficult for you to update or wait any longer. So here I will show you How to update Android 4.1 Jelly Bean on Galaxy S3 immediately.Pre-requisites
- Be sure to backup your data before starting the update
- Make sure your battery is at least 50% charged.
- Make sure that you have install Kies software on the computer, and if you dont have Kies, you can download it from Samsung website.
Heres How to Update Your AT&T Samsung Galaxy S III to Android 4.1 Jelly Bean
- Connect your Samsung Galaxy S III to your PC or laptop using the supplied USB cable. Ensure that Kies recognizes your device by looking in the upper section of the left-bar navigation menu. Your device should be listed.
- Kies Device Once Kies recognizes the device you will see a Lcd stating new firmware is available.
- Click Update.
- Read through the Caution pop-up and, if you agree, click to populate the I have read all of the above information checkbox.
- Read the Allow saving of information statement and select Allow saving or Proceed without saving and then click Start upgrade.
- After a few minutes, Kies will then begin transferring the firmware binary to the device.
- Then after a while the upgrade is completed.
- If completed a data backup from your device to Kies prior to performing the update, you can now restore that data back to the device under the new Jelly Bean operating system

Thursday, October 2, 2014
Samsung Galaxy S3 Touch Screen Not Working Solution

Wednesday, September 24, 2014
Samsung Galaxy S3 Ringer Ways Solution

Wednesday, September 10, 2014
Samsung Galaxy S3 Camera Problem fix problem

Samsung Galaxy S3 Camera Problem How to Fix problem,Samsung Galaxy S3 Camera error Problem How to Fix problem,Samsung Galaxy S3 Camera not working Problem How to Fix problem,Samsung Galaxy S3 Camera hang Problem How to Fix problem,Samsung Galaxy S3 Camera ic ways repair How to Fix problem Guide How to Fix problem.
Monday, September 8, 2014
Samsung Galaxy S3 Flash Light Problem fix problem

Sunday, September 7, 2014
Samsung Galaxy S3 Fm Radio Not Working fix problem

Thursday, September 4, 2014
How To Update Samsung Galaxy S3 LTE GT I9305 Firmware Version Using Odin Flasher
What is Firmware Update Process and Why We Need it:
The Firmware Update process means that your device will get a newer software version or we can say it will run with a newer version of its Operating System, For example if your Samsung Android device is running Android version 4.0.4 and Samsung release Android 4.1.2 version, Then you need to perform a Firmware Update process to install the new version into your device.
Mostly the new Firmware version is released to fix some bugs or to add some new functions, And sometimes it is released to fix some security threats.
What we should do before performing the update:
- First of all you should know your current device firmware version, Write it down so in case something goes wrong it will help you to fix your device.
- Check that you got the suitable firmware package for your device, And make sure to get it from trusted sources only.
- Check your devices battery level to be at least at 90%, Otherwise charge it before starting the update process.
- Make sure to backup any saved data into your device, Like contacts, messages...etc.
Needed Downloads For Updating Samsung I9305 GS3 LTE Firmware:
- Samsung I9305 GS3 LTE Stock Firmware Package.
- Odin Flasher.
- Samsung I9305 GS3 LTE USB Drivers.
Needed Tools For Updating Samsung I9305 GS3 LTE Firmware:
- Suitable USB cable.
- A stable computer running Windows OS.
Important Notice: We provide this guide for help purpose only, And we hold no responsibility at all, So keep in mind that your are doing this at your own RISK.
Preparation:
After downloading the needed files you should extract the zipped ones, And install the USB drivers (Restart your PC after installing).
Samsung GT-I9305 GS3 LTE Firmware Update Steps:
- Turn off the device, And take out its battery, SIM and memory cards.
Mostly the new Firmware version is released to fix some bugs or to add some new functions, And sometimes it is released to fix some security threats.
What we should do before performing the update:
- First of all you should know your current device firmware version, Write it down so in case something goes wrong it will help you to fix your device.
- Check that you got the suitable firmware package for your device, And make sure to get it from trusted sources only.
- Check your devices battery level to be at least at 90%, Otherwise charge it before starting the update process.
- Make sure to backup any saved data into your device, Like contacts, messages...etc.
Needed Downloads For Updating Samsung I9305 GS3 LTE Firmware:
- Samsung I9305 GS3 LTE Stock Firmware Package.
- Odin Flasher.
- Samsung I9305 GS3 LTE USB Drivers.
Needed Tools For Updating Samsung I9305 GS3 LTE Firmware:
- Suitable USB cable.
- A stable computer running Windows OS.
Important Notice: We provide this guide for help purpose only, And we hold no responsibility at all, So keep in mind that your are doing this at your own RISK.
Preparation:
After downloading the needed files you should extract the zipped ones, And install the USB drivers (Restart your PC after installing).
Samsung GT-I9305 GS3 LTE Firmware Update Steps:
- Turn off the device, And take out its battery, SIM and memory cards.
- Run Odin.exe program.
- Check these options: Re-Partition (If you have PIT file only), Auto Reboot, F.Reset Time.
- Click PIT button to select: m3.pit
- Firmware files selection:
Click PDA button to select: CODE_I9305xxxxxx_746327_REV00_user_low_ship.tar.md5
Click Phone button to select: MODEM_I9305xxxxxx_REV05_CL1213990.tar.md5
Click CSC button to select: CSC_xx_I9305Oxxxxxx_1065030_REV00_user_low_ship.tar.md5
- Entering the Download Mode:
Put the battery back into your device, Press and Hold Volume Down key + Power, After you get the warning message release all keys and press Volume Up key.
- Use the USB cable to connect your device to the computer, Dont use any USB-HUB for connecting, And use only main USB slots.
Click PDA button to select: CODE_I9305xxxxxx_746327_REV00_user_low_ship.tar.md5
Click Phone button to select: MODEM_I9305xxxxxx_REV05_CL1213990.tar.md5
Click CSC button to select: CSC_xx_I9305Oxxxxxx_1065030_REV00_user_low_ship.tar.md5
- Entering the Download Mode:
Put the battery back into your device, Press and Hold Volume Down key + Power, After you get the warning message release all keys and press Volume Up key.
- Use the USB cable to connect your device to the computer, Dont use any USB-HUB for connecting, And use only main USB slots.
- Wait until Windows detects the connected device and installs its suitable USB drivers.
- In case everything is OK, Then Odin program will detect your connected device (0:[COMxx]).
- Click on Start button.
- Odin program will start installing the new firmware files into your device, So wait until the device reboots.
- If the update was successfully done, Then you will notice PASS! Word at Odin program.
- Disconnect the USB cable.
- Check your device firmware version *#1234# (You should see the new installed one).
- Turn off the device again, Reinsert the SIM and memory cards and turn it on.
- Now you can customize your device after installing the new firmware version.
- If you made any backup of your device data before the update then you can restore it again.
- Done.
Notice: When you get one big file inside the firmware package, Then it should be selected as a PDA file only, And do not check Re-Partition option or use PIT file at all.
Tuesday, August 19, 2014
How to Root Samsung Galaxy S3 I9300 Android 4 1 2 With Guide
Just a month back Samsung released a minor 40 MB update for Samsung Galaxy S3 I9300 running Android 4.1.2 ( Feels bad stuck on Android 4.1.2 for ages ) , Officially there were no change logs provided for the update but we can assume that it was probably an minor performance upgrade . As it is with installing an Official software update , My Samsung galaxy S3 was unrooted in this process .
Once again i had to source for the latest CF auto root and Odin to root my Samsung galaxy S3 . In fact i even tried Framaroot which had previously worked on my Samsung galaxy S3 , but after the update Framaroot was unable to root my Galaxy S3 . So the only option i had left was to root my Samsung Galaxy S3 through Odin .
If you had installed the same update , then follow the instructions below to manually root your Samsung Galaxy S3 I9300 using Odin and CF-Auto-Root by Chainfire .
NOTE: This guide is only for users having the international version of the Samsung Galaxy S3 I9300 .
Instructions to Root Samsung Galaxy S3 using Odin
- Step 1: Download CF-Auto-Root and Odin from the links below :
Download Odin ( Use Odin 3.07 from this package )
- Step 2: Install Odin on your PC and run it as Administrator . Now lets prepare your phone for rooting .
- Step 3: Enable USB debugging in your phone . To enable USB debugging navigate to Settings > System > Developer options > Debugging > USB debugging .
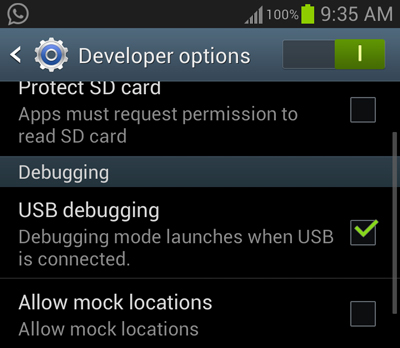
- Step 4: Turn off your phone and turn on your phone into download mode by pressing the Volume down + Home + Power keys together . When your phone displays a warning , press the Volume up button to continue into Download mode .
- Step 5: Connect your Samsung galaxy S3 to your PC using a Data cable .
- Step 6: You should now see the Odin’s ID:COM status change into blue and an Added message will be displayed .
- Step 7: Check Auto reboot and F.Reset options in Odin .
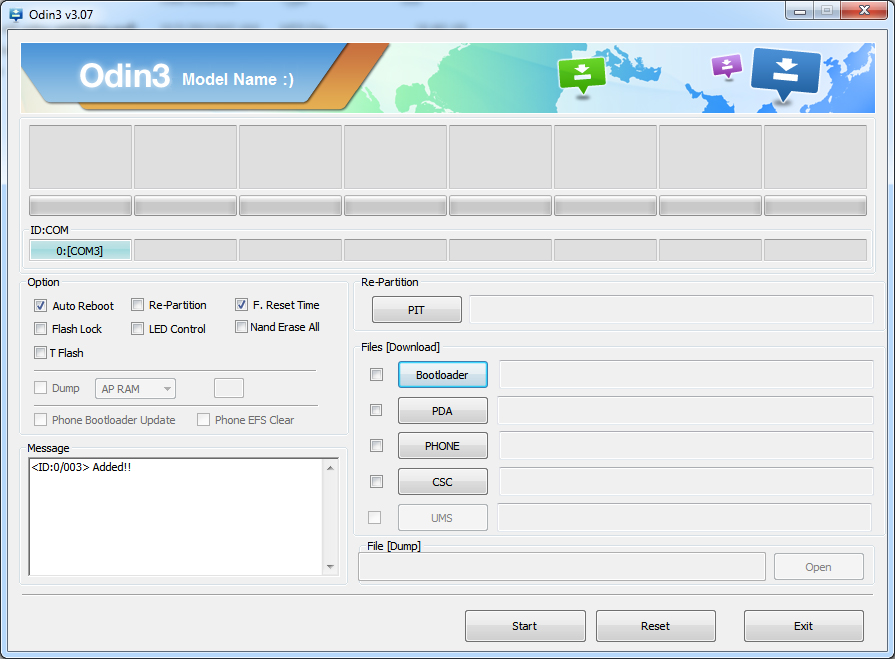
- Step 8: Click on the PDA button and select the CF-Autoroot file .
- Step 9: Double check all the instructions above and Click Start to Root your Samsung Galaxy S3 . Wait for a few minutes and you will see a Success message as below :
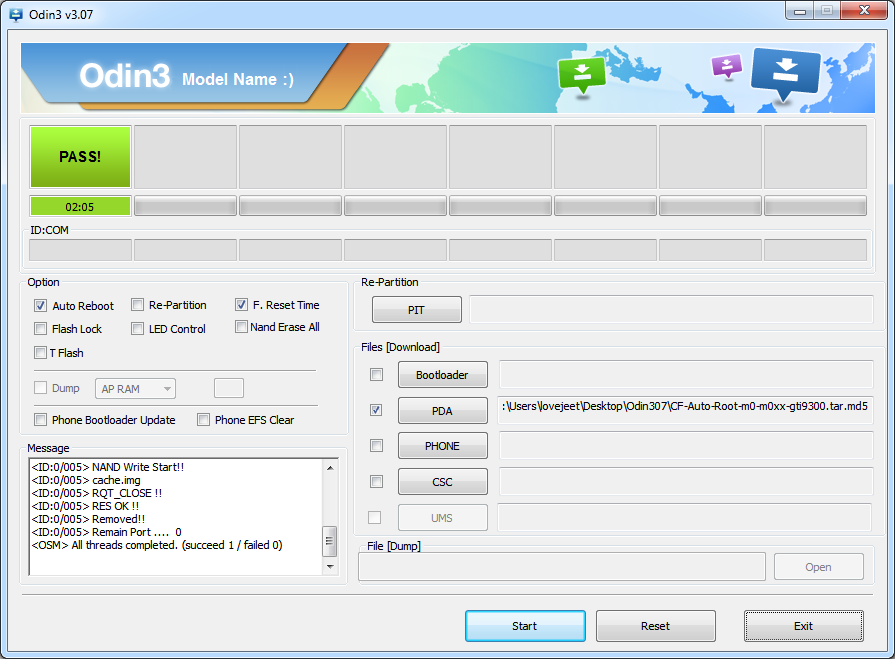
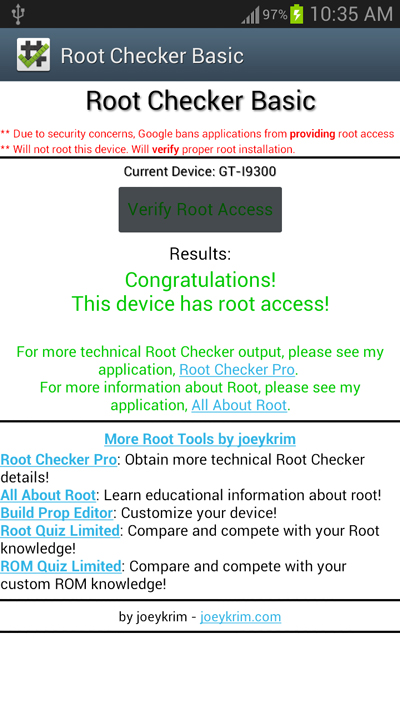
If you want to confirm whether your Samsung Galaxy S3 is rooted not then Install the Root checker app from the Google play store .Here is a screenshot of root checker app on my Samsung Galaxy S3 .
Incoming search terms:
- how to root samsung galaxy s3
- how to root galaxy s3
- root galaxy s3
- how to root s3
- root samsung galaxy s3
Monday, August 18, 2014
One Click Root Solution for Galaxy S3 S2 Note 2 and More Available Root guide Included
When using a high end Android based smartphone is all about customization and optimization operations, as we can’t stop from improving and upgrading our gadgets for receiving more power, latest apps, new features and a better web browsing experience. But for being able to do the mentioned tasks you must first free your device from the factory restrictions and default settings. Because of that you must learn how to gain access over the internal system of your handset, access that can be granted once you root the OS.
As you know, usually the root procedure is quite complex and risky so not all the Android users are able to safely complete the operation. Furthermore, in some cases, while trying to gain root access the phone gets bricked and since the warranty is void, you will find yourselves in an unpleasant situation. In order to avoid these situations, we have the one-click tool, which offers a safe and fast root solution for the Android based devices. Unfortunately not all the smartphones can be rooted by using the one click root tool.
Now, as mentioned in the title of the present step by step guide, those of xda-developers had made available a one-click root solution for all the most important Samsung devices, so we will be checking in how to easily root your Galaxy S3, S2, Note and Note 2, Galaxy Camera and more. The process will be easy to understand and to complete as there are only a few steps to take care of. Also, being a one click root solution, you will be able to free your Android powered Samsung smartphone / tablet by running a dedicated app that will do all the work for you.
But, before heading to the proper root tutorial, you should check the list from below. You have there all the supported Samsung devices that can be unlocked by using the present method. Don’t apply this step by step guide if your phone or tablet isn’t mentioned in the image from below.
![List]()
Now, you should first prepare your gadget for the process that will shortly follow. Else you will not be able to one-click root your Samsung device, and worst you can even end up in bricking your smartphone. So, take your time and read all the lines from this tutorial and especially the pre requisites which are being presented below.
Now, you can look forward in performing other complex operations on your phone as its system has been unchained. You can install a custom recovery image, update the device with a custom ROM firmware, install apps that requires root access in order to work properly, remove in-built programs for increasing the speeds and a lot more. Do share your thoughts and impressions with us and with other users who might want to try this tutorial by using our comments area from below.
Read More..
As you know, usually the root procedure is quite complex and risky so not all the Android users are able to safely complete the operation. Furthermore, in some cases, while trying to gain root access the phone gets bricked and since the warranty is void, you will find yourselves in an unpleasant situation. In order to avoid these situations, we have the one-click tool, which offers a safe and fast root solution for the Android based devices. Unfortunately not all the smartphones can be rooted by using the one click root tool.
Now, as mentioned in the title of the present step by step guide, those of xda-developers had made available a one-click root solution for all the most important Samsung devices, so we will be checking in how to easily root your Galaxy S3, S2, Note and Note 2, Galaxy Camera and more. The process will be easy to understand and to complete as there are only a few steps to take care of. Also, being a one click root solution, you will be able to free your Android powered Samsung smartphone / tablet by running a dedicated app that will do all the work for you.
But, before heading to the proper root tutorial, you should check the list from below. You have there all the supported Samsung devices that can be unlocked by using the present method. Don’t apply this step by step guide if your phone or tablet isn’t mentioned in the image from below.
List of supported devices
- It is more than recommended to backup the data from your handset. Usually the system is not wiped out by using a one-click root tool, but considering that you can save bank accounts and passwords on your smartphone it is a good idea to save all of your personal info before going any further.
- You can use our backup and restore guides for learning how to save the contacts list, the text messages, the call logs, market apps, internet settings, the EFS folder and even the current ROM.
- Remember that by rooting, the warranty of your device will be void.
- Your Samsung handset must be charged (if there is less than 60% power left) before starting the root operation or else it might get turned off in the middle of the process.
- On your phone the USB debugging option must be enabled; so go to “Settings -> Device Information -> Enable USB Debugging Mode”.
- Remember to check the list of supported devices before applying something on your Samsung tablet / smartphone.
How to Root Samsung devices with One Click app
- The first thing to do is to download the Framaroot app (this is the one click tool that will be used).
- Use the link from here.
- Then, install the APK which has been downloaded before on your Samsung smartphone / tablet or camera.
- Now, by using the File Manager from your device, search for the APK file and run the same.
- The installation will now begin; in the end your handset will be rooted meaning that you are done.
Now, you can look forward in performing other complex operations on your phone as its system has been unchained. You can install a custom recovery image, update the device with a custom ROM firmware, install apps that requires root access in order to work properly, remove in-built programs for increasing the speeds and a lot more. Do share your thoughts and impressions with us and with other users who might want to try this tutorial by using our comments area from below.
Thursday, August 14, 2014
Samsung Galaxy S3 Blutooth Problem Solution

Subscribe to:
Posts (Atom)
