Thursday, September 18, 2014
HTC Desire X Factory data reset
| HTC Desire X Factory data reset |
Performing a factory data reset HTC Desire X from settings
- Slide the Notifications panel open, and then tap Settings
- Tab Storage
- Tab Factory data reset.
- Tab Reset phone
- Tab Erase everything.
Performing a factory reset using external keys
If you can’t turn the device on or access settings, you can still perform a factory reset by using the hardware buttons.
- Remove the battery, wait for a few seconds, then reinsert the battery.
- Press and hold the VOLUME DOWN button, and then press and hold the POWER button.
- Wait for the Lcd with the three Android images to appear, and then release the POWER and VOLUME DOWN buttons.
- Press VOLUME DOWN to select FACTORY RESET, and then press the POWER button.
Performing a Soft reset
If HTC Desire X is running slower than normal, an application is not performing properly, or HTC Desire X becomes unresponsive, try restarting HTC Desire X and see if that helps solve the problem.
If the display is off, press the POWER button to turn it back on.
Unlock the display.
Press and hold the POWER button, and then tap Restart.
When asked to confirm, tap Restart.
Warning! All data will be erased from device memory, including system and application data, settings and downloaded applications. Back up your important data. The device will restore to factory settings.
If your phone hangs or does not responding, Press and hold power key about 10 seconds. It will rebooting automatically. Or remove and re insert the battery and SIM Card.


AT T Samsung Infuse 4G I997 Android 2 3 6 Gingerbread Stock ROMs

Stock ROM I997UCKK3 [Android 2.3.6] 21.11.2011
Stock ROM I997UCKK2 [Android 2.3.6] 09.11.2011
Stock ROM I997UCKK1 [Android 2.3.6] 09.11.2011
Stock ROM I997UCKJ4 [Android 2.3.6] 28.10.2011
Stock ROM I997UCKJ2 [Android 2.3.6]14.10.2011
Odin Guide for Flashing the Stock ROMs
1) Install Kies on your PC just to ensure that the drivers for the Infuse 4G are already installed
2) Download and unzip the stock ROM files packaged
3) Use and run Odin3 v1.7.exe
4) Set the Infuse 4G into download mode - turn it off or pull battery then in-place it back again ,
( Just press and hold both Volume Buttons while plugging in the USB cable cord)
5) In Odin, the COM: Port box will display that your phone is already connected
If there is multiple files in the packaged you may just put the desired files on each designated slots.
6) Click the PDA button and choose the PDA_.tar.md5
7) Click the PHONE button and choose MODEM_.tar.md5
Bootloader for APBOOT_.tar.md5 and CSC file for CSC slots.
8) Press Start
9) Once it finishes, it will reboot to recovery. Just select "delete all user data" and then select reboot system now.
Heres the stock rooted version, deodexed with busybox and SU and Zipalligned installed. The installation is simple - just download the Zip, Boot into recovery, wipe data and dalvik cache then flash and reboot.
Stock I997UCKK3 Rooted, Deodexed, Busybox, Zipaligned, 2.3.6
by dman3285
Stock I997UCKJ4 Rooted, Deodexed, Busybox, 2.3.6
Stock I997UCKJ2 Rooted, Deodexed, Busybox, 2.3.6
Stock I997UCKK1 Rooted, Deodexed, Busybox, ZipAligned 2.3.6

Wednesday, September 17, 2014
BlackBerry 8520 sim ways solution 100 tested solution
blackberry 8520 insert sim solution,blackberry 8520 sim ways solution,blackberry 8520 sim line solution , blackberry 8520 without ic sim jumper solution
blackberry 8520 sim line damage solution blackberry 8520 insert sim card sim card not working solution without ic only jumper easy way 100% tested solution
see and enjoy it see my solution 100% working this solution many time tested solution see picture and jumper line solve your problem.many phone water damage sim not accept show only insert sim phone sim not accept i have this solution 100% tested
blackberry 8520 sim line damage solution blackberry 8520 insert sim card sim card not working solution without ic only jumper easy way 100% tested solution
see and enjoy it see my solution 100% working this solution many time tested solution see picture and jumper line solve your problem.many phone water damage sim not accept show only insert sim phone sim not accept i have this solution 100% tested

if u need blackberry 8520 sim way 100% solution here only see this line step by step
always done many phone me.
Asha 203 Asha 202 Insert Sim how to fix problem
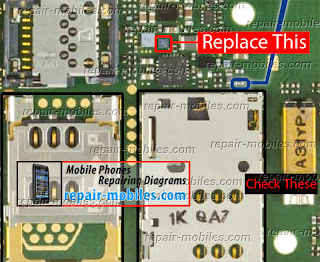
This solution applies to both Nokia Asha 202 and Nokia Asha 203. Insert Sim card problem can occur in these phones in case of damaged Sim connector.
So first of all you should check if the Sim Connector in Nokia Asha 202 and Asha 203 is busted and replace it. If that is not the case then you have to replace the Sim IC placed near the Sim Jacket. I have marked the the Sim IC in the following diagram.
Please Note that we will edit these solutions or add new ones if found in this page at any time in the future. So feel free to come back any time on this page to stay up to date.
If you have further Questions please dont hesitate to leave a comment.
Note: Every repairing solution posted here is tested by at least one member of our team. Use the information available here at Your Own Risk. We are not responsible if any harm comes to your device during the repairing process.
Nokia x3 00 always hang solved procedure inside
Nokia x3-00 always hang solved procedure inside
model:NOKIA X3-00
Problem:always hang
action taken
Procedure follow Lcdshot


thanks for viewing
model:NOKIA X3-00
Problem:always hang
action taken
Procedure follow Lcdshot
thanks for viewing
Subscribe to:
Posts (Atom)
